Canon 45 MC ZR50 ZR45MC Instruction Manual - Page 23
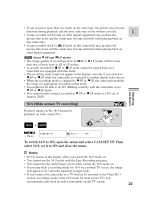
Wide screen TV recording
 |
UPC - 013803010510
View all Canon 45 MC manuals
Add to My Manuals
Save this manual to your list of manuals |
Page 23 highlights
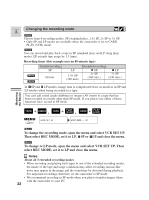
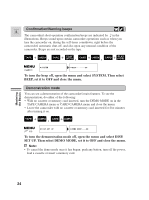
• If you record in more than one mode on the same tape, the picture may become distorted during playback and the time code may not be written correctly. E • A tape recorded in LP mode on other digital equipment may produce the mosaic-like noise and the sound may become distorted when playing back on this camcorder. • A tape recorded in LP or LP mode on this camcorder may produce the mosaic-like noise and the sound may become distorted when playing back on other digital equipment. About SP and LP modes • The image quality of recordings done in SP or LP modes will be lower than that of those done in SP or LP modes. • A cassette recorded in SP or LP mode cannot be played back on a camcorder not equipped with that mode. • The recording mode might not appear in the display correctly if you switch to SP or LP while the camcorder is connected to another digital video device. • When the recording mode is changed to SP or LP, the camcorder modifies the image for appropriate recording in that mode. • You might not be able to do DV dubbing correctly with the camcorder set to SP or LP mode. • You cannot transfer images recorded in SP or LP mode to a PC (as of January 2002). Mastering the Basics 16:9 (Wide screen TV recording) Produces images in the 16:9 format for playback on wide screen TVs. + TAPE CAMERA ( 40) CAM.SET UP 16:9 OFF To switch 16:9 to ON, open the menu and select CAM.SET UP. Then select 16:9, set it to ON and close the menu. Notes: • 1"6:9"is shown in the display when you switch the 16:9 mode on. • You cannot use the 16:9 mode with the Easy Recording program. • You cannot use the multi-image screen when setting the 16:9 mode on. • If you play back a recording made for 16:9 on a normal TV screen, the image will appear to be vertically "squashed"(compressed). • If you connect the camcorder to a TV with an S1 terminal or the Video ID-1 system, recordings made in the 16:9 mode for wide screen TVs will automatically play back in wide screen mode on the TV screen. 23
-
 1
1 -
2
-
3
-
4
-
5
-
6
-
7
-
8
-
9
-
10
-
11
-
12
-
13
-
14
-
15
-
16
-
17
-
 18
18 -
 19
19 -
 20
20 -
 21
21 -
 22
22 -
 23
23 -
 24
24 -
 25
25 -
 26
26 -
 27
27 -
 28
28 -
29
-
30
-
31
-
32
-
33
-
34
-
35
-
36
-
37
-
38
-
39
-
40
-
41
-
42
-
43
-
44
-
45
-
46
-
47
-
48
-
49
-
50
-
51
-
52
-
53
-
54
-
55
-
56
-
57
-
58
-
59
-
60
-
61
-
62
-
63
-
64
-
65
-
66
-
67
-
68
-
69
-
70
-
71
-
72
-
73
-
74
-
75
-
76
-
77
-
78
-
79
-
80
-
81
-
82
-
83
-
84
-
85
-
86
-
87
-
88
-
89
-
90
-
91
-
92
-
93
-
94
-
95
-
96
-
97
-
98
-
99
-
100
-
101
-
102
-
103
-
104
-
105
-
106
-
107
-
108
-
109
-
110
-
111
-
112
-
113
-
114
-
115
-
116
-
117
-
118
-
119
-
120
-
121
-
122
-
123
-
124
-
125
-
126
-
127
-
128
-
129
-
130
-
131
-
132
-
133
-
134
-
135
-
136
-
137
-
138
-
139
-
140
-
141
-
142
-
143
-
144
-
145
-
146
-
147
-
148
-
149
-
150
-
151
-
152
-
153
-
154
-
155
-
156
-
157
-
158
-
159
-
160
-
161
-
162
-
163
-
164
 |
 |