Canon 45 MC ZR50 ZR45MC Instruction Manual - Page 74
Using the VL-3 Video Light optional
 |
UPC - 013803010510
View all Canon 45 MC manuals
Add to My Manuals
Save this manual to your list of manuals |
Page 74 highlights
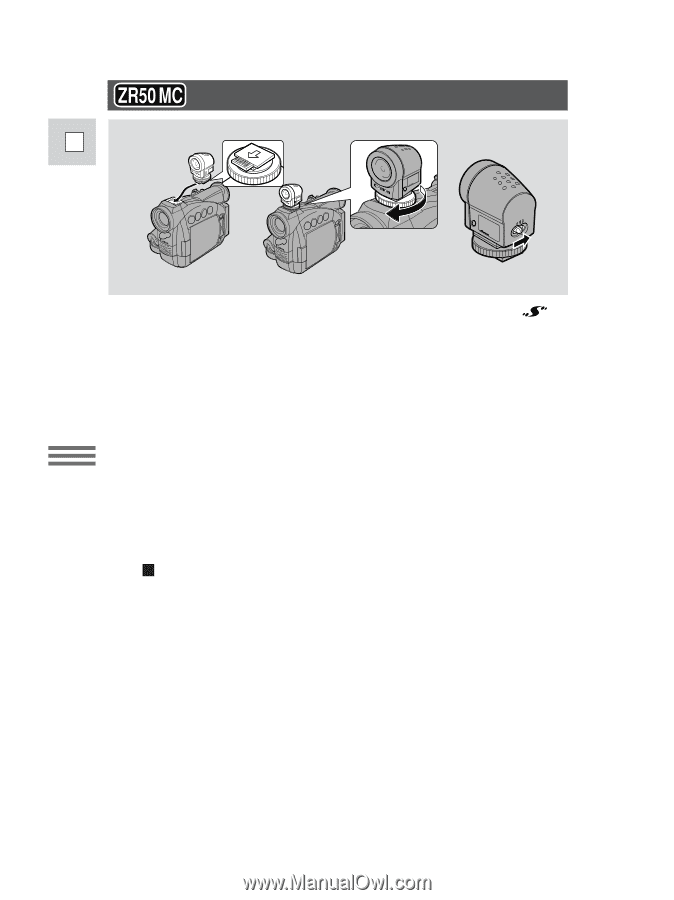
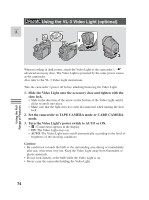
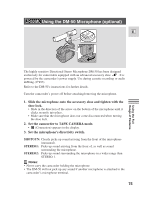
Using the VL-3 Video Light (optional) E LOCK 1 1 LOCK LOCK AUTO ON OFF LOCK 3 Using the Full Range of Features When recording in dark rooms, attach the Video Light to the camcorder's advanced accessory shoe. The Video Light is powered by the same power source as the camcorder. Also refer to the VL-3 Video Light instructions. Turn the camcorder's power off before attaching/removing the Video Light. 1. Slide the Video Light onto the accessory shoe and tighten with the shoe lock. • Slide in the direction of the arrow on the bottom of the Video Light until it clicks securely into place. • Make sure that the light does not come disconnected when turning the shoe lock. 2. Set the camcorder to TAPE CAMERA mode or CARD CAMERA mode. 3. Turn the Video Light's power switch to AUTO or ON. • C (Connection) appears in the display. • ON: The Video Light stays on. • AUTO: The Video Light turns on/off automatically according to the level of brightness of the shooting conditions. Caution: • Be careful not to touch the bulb or the surrounding area during or immediately after use; it becomes very hot. Keep the Video Light away from flammable or plastic materials. • Do not look directly at the bulb while the Video Light is on. • Never carry the camcorder holding the Video Light. 74
-
 1
1 -
2
-
3
-
4
-
5
-
6
-
7
-
8
-
9
-
10
-
11
-
12
-
13
-
14
-
15
-
16
-
17
-
18
-
19
-
20
-
21
-
22
-
23
-
24
-
25
-
26
-
27
-
28
-
29
-
30
-
31
-
32
-
33
-
34
-
35
-
36
-
37
-
38
-
39
-
40
-
41
-
42
-
43
-
44
-
45
-
46
-
47
-
48
-
49
-
50
-
51
-
52
-
53
-
54
-
55
-
56
-
57
-
58
-
59
-
60
-
61
-
62
-
63
-
64
-
65
-
66
-
67
-
68
-
 69
69 -
 70
70 -
 71
71 -
 72
72 -
 73
73 -
 74
74 -
 75
75 -
 76
76 -
 77
77 -
 78
78 -
 79
79 -
80
-
81
-
82
-
83
-
84
-
85
-
86
-
87
-
88
-
89
-
90
-
91
-
92
-
93
-
94
-
95
-
96
-
97
-
98
-
99
-
100
-
101
-
102
-
103
-
104
-
105
-
106
-
107
-
108
-
109
-
110
-
111
-
112
-
113
-
114
-
115
-
116
-
117
-
118
-
119
-
120
-
121
-
122
-
123
-
124
-
125
-
126
-
127
-
128
-
129
-
130
-
131
-
132
-
133
-
134
-
135
-
136
-
137
-
138
-
139
-
140
-
141
-
142
-
143
-
144
-
145
-
146
-
147
-
148
-
149
-
150
-
151
-
152
-
153
-
154
-
155
-
156
-
157
-
158
-
159
-
160
-
161
-
162
-
163
-
164
 |
 |