Canon 45 MC ZR50 ZR45MC Instruction Manual - Page 97
Audio Dubbing
 |
UPC - 013803010510
View all Canon 45 MC manuals
Add to My Manuals
Save this manual to your list of manuals |
Page 97 highlights
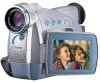
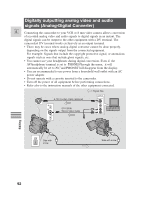
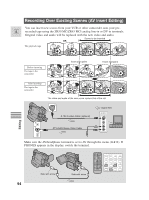
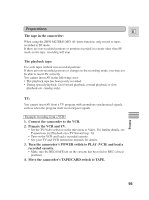
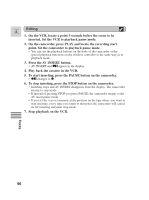
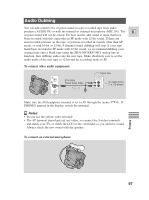
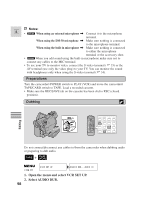
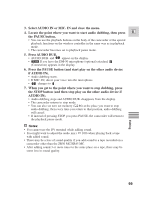
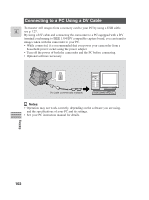
Audio Dubbing You can add sound to the original sound on a pre-recorded tape from audio products (AUDIO IN) or with the internal or external microphone (MIC. IN). The E original sound will not be erased. For best results, add sound to tapes that have been recorded with this camcorder in SP mode with 12-bit sound. If there are non-recorded portions on the tape, or portions recorded in a mode other than SP mode, or with 16-bit or 12-bit, 4-channel sound, dubbing will stop. If your tape hasnt' been recorded in SP mode with 12-bit sound, we recommend dubbing your original tape onto a blank tape using the ZR50 MC/ZR45 MCs' analog line-in function, then dubbing audio onto the new tape. Make absolutely sure to set the audio mode of the new tape to 12-bit and the recording mode to SP. To connect other audio equipment: AV MIC STV-250N Stereo Video Cable : Signal flow OUTPUT AUDIO L R An audio device (i. e. CD player) Make sure the AV/headphone terminal is set to AV through the menu ( 34). If PHONES appears in the display, switch the terminal. Notes: • Do not use the yellow video terminal. • The AV terminal doesnt' put out any video, so connect the S-video terminals and check your TV, or check the LCD or the viewfinder as you add new sound. Always check the new sound with the speaker. To connect an external microphone: Editing 97
-
 1
1 -
2
-
3
-
4
-
5
-
6
-
7
-
8
-
9
-
10
-
11
-
12
-
13
-
14
-
15
-
16
-
17
-
18
-
19
-
20
-
21
-
22
-
23
-
24
-
25
-
26
-
27
-
28
-
29
-
30
-
31
-
32
-
33
-
34
-
35
-
36
-
37
-
38
-
39
-
40
-
41
-
42
-
43
-
44
-
45
-
46
-
47
-
48
-
49
-
50
-
51
-
52
-
53
-
54
-
55
-
56
-
57
-
58
-
59
-
60
-
61
-
62
-
63
-
64
-
65
-
66
-
67
-
68
-
69
-
70
-
71
-
72
-
73
-
74
-
75
-
76
-
77
-
78
-
79
-
80
-
81
-
82
-
83
-
84
-
85
-
86
-
87
-
88
-
89
-
90
-
91
-
 92
92 -
 93
93 -
 94
94 -
 95
95 -
 96
96 -
 97
97 -
 98
98 -
 99
99 -
 100
100 -
 101
101 -
 102
102 -
103
-
104
-
105
-
106
-
107
-
108
-
109
-
110
-
111
-
112
-
113
-
114
-
115
-
116
-
117
-
118
-
119
-
120
-
121
-
122
-
123
-
124
-
125
-
126
-
127
-
128
-
129
-
130
-
131
-
132
-
133
-
134
-
135
-
136
-
137
-
138
-
139
-
140
-
141
-
142
-
143
-
144
-
145
-
146
-
147
-
148
-
149
-
150
-
151
-
152
-
153
-
154
-
155
-
156
-
157
-
158
-
159
-
160
-
161
-
162
-
163
-
164
 |
 |