Canon EOS Rebel T1i ImageBrowser 6.6 for Macintosh Instruction Manual - Page 30
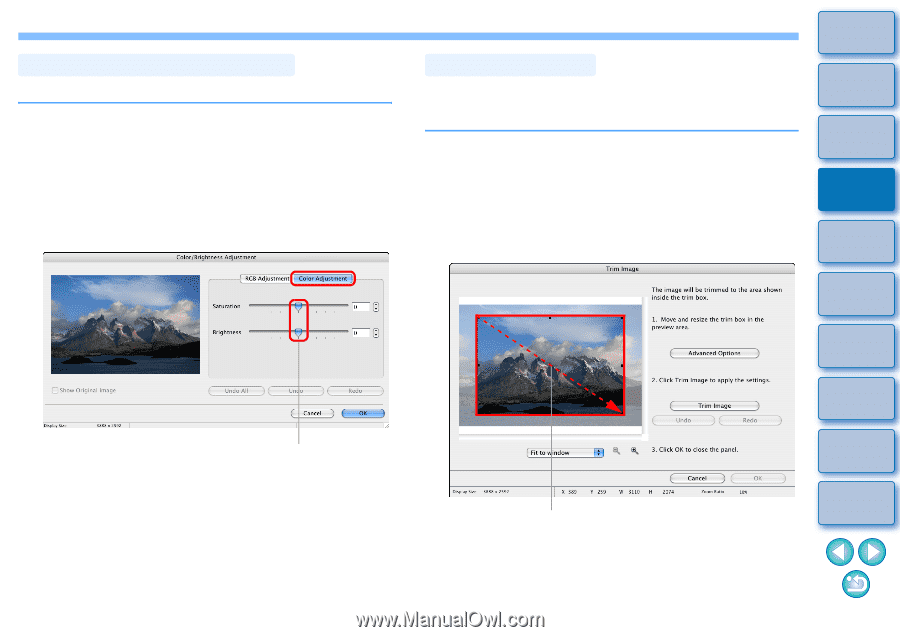
Adjusting Color and Brightness, Trimming an Image, Click [Edit] and then select [Color/Brightness
 |
View all Canon EOS Rebel T1i manuals
Add to My Manuals
Save this manual to your list of manuals |
Page 30 highlights
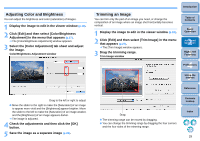
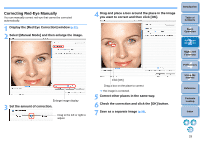
Adjusting Color and Brightness You can adjust the brightness and color (saturation) of images. 1 Display the image to edit in the viewer window (p.18). 2 Click [Edit] and then select [Color/Brightness Adjustment] in the menu that appears (p.27). The [Color/Brightness Adjustment] window appears. 3 Select the [Color Adjustment] tab sheet and adjust the image. Color/Brightness Adjustment window Trimming an Image You can trim only the part of an image you need, or change the composition of an image where an image shot horizontally becomes vertical. 1 Display the image to edit in the viewer window (p.18). 2 Click [Edit] and then select [Trim Image] in the menu that appears (p.27). The [Trim Image] window appears. 3 Drag the trimming range. Trim Image window Introduction Table of Contents 1Basic Operation 2Advanced Operation 3High-Level Functions 4 Preferences 5Using the Internet Reference Drag to the left or right to adjust Move the slider to the right to make the [Saturation] of an image to appear more vivid and the [Brightness] appear brighter. Move the slider to the left to make the [Saturation] of an image weaker, and the [Brightness] of an image appears darker. The image is adjusted. 4 Check the adjustments and then click the [OK] button. 5 Save the image as a separate image (p.28). Contents Lookup Drag The trimming range can be moved by dragging. You can change the trimming range by dragging the four corners and the four sides of the trimming range. Index 29
-
 1
1 -
2
-
3
-
4
-
5
-
6
-
7
-
8
-
9
-
10
-
11
-
12
-
13
-
14
-
15
-
16
-
17
-
18
-
19
-
20
-
21
-
22
-
23
-
24
-
 25
25 -
 26
26 -
 27
27 -
 28
28 -
 29
29 -
 30
30 -
 31
31 -
 32
32 -
 33
33 -
 34
34 -
 35
35 -
36
-
37
-
38
-
39
-
40
-
41
-
42
-
43
-
44
-
45
-
46
-
47
-
48
-
49
-
50
-
51
-
52
-
53
-
54
-
55
-
56
-
57
-
58
-
59
-
60
-
61
-
62
-
63
-
64
-
65
-
66
-
67
-
68
-
69
-
70
-
71
-
72
-
73
-
74
-
75
-
76
-
77
-
78
-
79
-
80
-
81
-
82
-
83
-
84
 |
 |