Canon MultiPASS C755 Service Manual - Page 38
Disassembly 4 and Disassembly 5, Disassembly 4., Print ass'y
 |
View all Canon MultiPASS C755 manuals
Add to My Manuals
Save this manual to your list of manuals |
Page 38 highlights
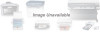
MultiPASS C755 Chapter 2: Assembly and Disassembly Disassembly 4. Print ass'y (1) Perform Disassembly 1., and Disassembly 2. from (2) till (4). Then perform Disassembly 3 (2). (2) Remove the two screws (a). (3) Use a screwdriver or similar to prise loose the two tabs (e). (4) Take hold of the handles shown in the diagram, and take out the printer (c). Disassembly 5. Power supply unit (1) Perform Disassembly 4. and then remove the printer assembly. (2) Remove the two screws (b). (2) Remove the power supply unit (d). a c b b d a e Figure 2-8 Disassembly 4 and Disassembly 5 2-11
-
 1
1 -
2
-
3
-
4
-
5
-
6
-
7
-
8
-
9
-
10
-
11
-
12
-
13
-
14
-
15
-
16
-
17
-
18
-
19
-
20
-
21
-
22
-
23
-
24
-
25
-
26
-
27
-
28
-
29
-
30
-
31
-
32
-
 33
33 -
 34
34 -
 35
35 -
 36
36 -
 37
37 -
 38
38 -
 39
39 -
 40
40 -
 41
41 -
 42
42 -
 43
43 -
44
-
45
-
46
-
47
-
48
-
49
-
50
-
51
-
52
-
53
-
54
-
55
-
56
-
57
-
58
-
59
-
60
-
61
-
62
-
63
-
64
-
65
-
66
-
67
-
68
-
69
-
70
-
71
-
72
-
73
-
74
-
75
-
76
-
77
-
78
-
79
-
80
-
81
-
82
-
83
-
84
-
85
-
86
-
87
-
88
-
89
-
90
-
91
-
92
-
93
-
94
-
95
-
96
-
97
-
98
-
99
-
100
-
101
-
102
-
103
-
104
-
105
-
106
-
107
-
108
-
109
-
110
-
111
-
112
-
113
-
114
-
115
-
116
-
117
-
118
-
119
-
120
-
121
-
122
-
123
-
124
-
125
-
126
-
127
-
128
-
129
-
130
-
131
-
132
-
133
-
134
-
135
-
136
-
137
-
138
-
139
-
140
-
141
-
142
-
143
 |
 |

2-11
MultiPASS C755
Chapter 2: Assembly and Disassembly
Disassembly 4.
Print ass’y
(1) Perform Disassembly 1., and Disassembly 2. from (2) till (4).
Then perform Disassembly 3 (2).
(2) Remove the two screws (a).
(3) Use a screwdriver or similar to prise loose the two tabs (e).
(4) Take hold of the handles shown in the diagram, and take out the printer (c).
Disassembly 5. Power supply unit
(1) Perform Disassembly 4. and then remove the printer assembly.
(2) Remove the two screws (b).
(2) Remove the power supply unit (d).
Figure 2-8 Disassembly 4 and Disassembly 5
e
e
c
b
d
b
a
a