Canon MultiPASS C755 Service Manual - Page 62
When the Head Gap Needs Adjustment, Head Gap Adjustment 1
 |
View all Canon MultiPASS C755 manuals
Add to My Manuals
Save this manual to your list of manuals |
Page 62 highlights
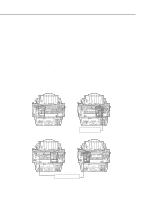
MultiPASS C755 Chapter 3: Maintenance & Service 3.5 When the Head Gap Needs Adjustment If the screws fixing the head gap adjustment plate attached to the printer frame become loose, it will be necessary to adjust the head gap. Preparing for adjustment 1) Remove the printer unit from the main unit. 2) Remove the paper selctor lever spring and left/right shaft clips, and attach to the main unit. 3) Rotate the red screws for fixing both sides of the printer chassis by half a turn to loosen them from their fixed position. 4) Move the paper selctor lever to the thick paper position (lower position). Make sure that the gap gauge is not deformed and no foreign matter is attached to the gap gauge or the platen before performing the adjustment. Carriage Belt Head Gap Adjustment Board (Left) Fixing Screw (Red) Fixing Screw (Red) Head Gap Adjustment Shaft Clip Board (Right) Paper Selector Lever Black BJ Cartridge Paper Selector Lever Plain Paper Position Thick Paper Position Paper Selector Lever Spring Figure 3-8 Head Gap Adjustment 1 3-11
-
 1
1 -
2
-
3
-
4
-
5
-
6
-
7
-
8
-
9
-
10
-
11
-
12
-
13
-
14
-
15
-
16
-
17
-
18
-
19
-
20
-
21
-
22
-
23
-
24
-
25
-
26
-
27
-
28
-
29
-
30
-
31
-
32
-
33
-
34
-
35
-
36
-
37
-
38
-
39
-
40
-
41
-
42
-
43
-
44
-
45
-
46
-
47
-
48
-
49
-
50
-
51
-
52
-
53
-
54
-
55
-
56
-
 57
57 -
 58
58 -
 59
59 -
 60
60 -
 61
61 -
 62
62 -
 63
63 -
 64
64 -
 65
65 -
 66
66 -
 67
67 -
68
-
69
-
70
-
71
-
72
-
73
-
74
-
75
-
76
-
77
-
78
-
79
-
80
-
81
-
82
-
83
-
84
-
85
-
86
-
87
-
88
-
89
-
90
-
91
-
92
-
93
-
94
-
95
-
96
-
97
-
98
-
99
-
100
-
101
-
102
-
103
-
104
-
105
-
106
-
107
-
108
-
109
-
110
-
111
-
112
-
113
-
114
-
115
-
116
-
117
-
118
-
119
-
120
-
121
-
122
-
123
-
124
-
125
-
126
-
127
-
128
-
129
-
130
-
131
-
132
-
133
-
134
-
135
-
136
-
137
-
138
-
139
-
140
-
141
-
142
-
143
 |
 |
