Casio LK280 User Guide - Page 35
Lesson Settings
 |
View all Casio LK280 manuals
Add to My Manuals
Save this manual to your list of manuals |
Page 35 highlights
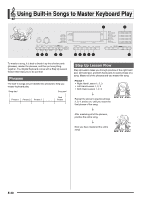
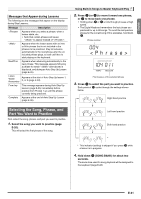
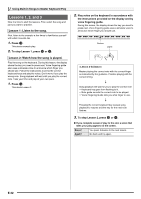
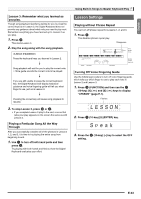
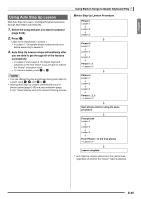
English Lesson 3: Remember what you learned as you play. Though song playback stands by waiting for you to press the correct keys as in Lesson 2, the Digital Keyboard does not provide any guidance about what note you need to play next. Remember everything you have learned up to Lesson 2 as you play. 1. Press ck. This starts Lesson 3. 2. Play the song along with the song playback. Press the keyboard keys you learned in Lesson 2. 4 Song playback will wait for you to play the correct note. • Note guide sounds the correct note to be played. 4 If you are still unable to press the correct keyboard key, the Digital Keyboard will display keyboard guidance and voice fingering guide will tell you what finger to use, just as in Lesson 2. 4 Pressing the correct key will cause song playback to resume. 3. To stop Lesson 3, press ck or bk. • If you complete Lesson 3 play to the end, a score that rates your play appears on the screen the same as with Lesson 2. Playing a Particular Song All the Way Through After you successfully complete all of the phrases in Lessons 1, 2, and 3, it is time to try playing the entire song from beginning to end. bl 1. Use to turn off both hand parts and then press bk. Try playing with both hands and find out how the Digital Keyboard evaluates your effort. Using Built-in Songs to Master Keyboard Play Lesson Settings Playing without Phrase Repeat You can turn off phrase repeat for Lessons 1, 2, and 3. 1. Press 6. This disables phrase repeat play. Disappears Turning Off Voice Fingering Guide Use the following procedure to turn off voice fingering guide, which tells you which finger to use to play each note in Lesson 2 and Lesson 3. 1. Press ct (FUNCTION) and then use the br (10-key) [4] (o) and [6] (p) keys to display "LESSON" (page E-7). Flashes L ESSON br 2. Press (10-key) [9] (ENTER) key. Speak br 3. Press the (10-key) [-] key to select the OFF setting. E-33
-
 1
1 -
2
-
3
-
4
-
5
-
6
-
7
-
8
-
9
-
10
-
11
-
12
-
13
-
14
-
15
-
16
-
17
-
18
-
19
-
20
-
21
-
22
-
23
-
24
-
25
-
26
-
27
-
28
-
29
-
 30
30 -
 31
31 -
 32
32 -
 33
33 -
 34
34 -
 35
35 -
 36
36 -
 37
37 -
 38
38 -
 39
39 -
 40
40 -
41
-
42
-
43
-
44
-
45
-
46
-
47
-
48
-
49
-
50
-
51
-
52
-
53
-
54
-
55
-
56
-
57
-
58
-
59
-
60
-
61
-
62
-
63
-
64
-
65
-
66
-
67
-
68
-
69
-
70
-
71
-
72
-
73
-
74
-
75
-
76
 |
 |