D-Link DGS-3208TG User Guide - Page 69
Update Firmware and Configuration Files, Index, Status, Description, Port Member, Update
 |
UPC - 790069239366
View all D-Link DGS-3208TG manuals
Add to My Manuals
Save this manual to your list of manuals |
Page 69 highlights
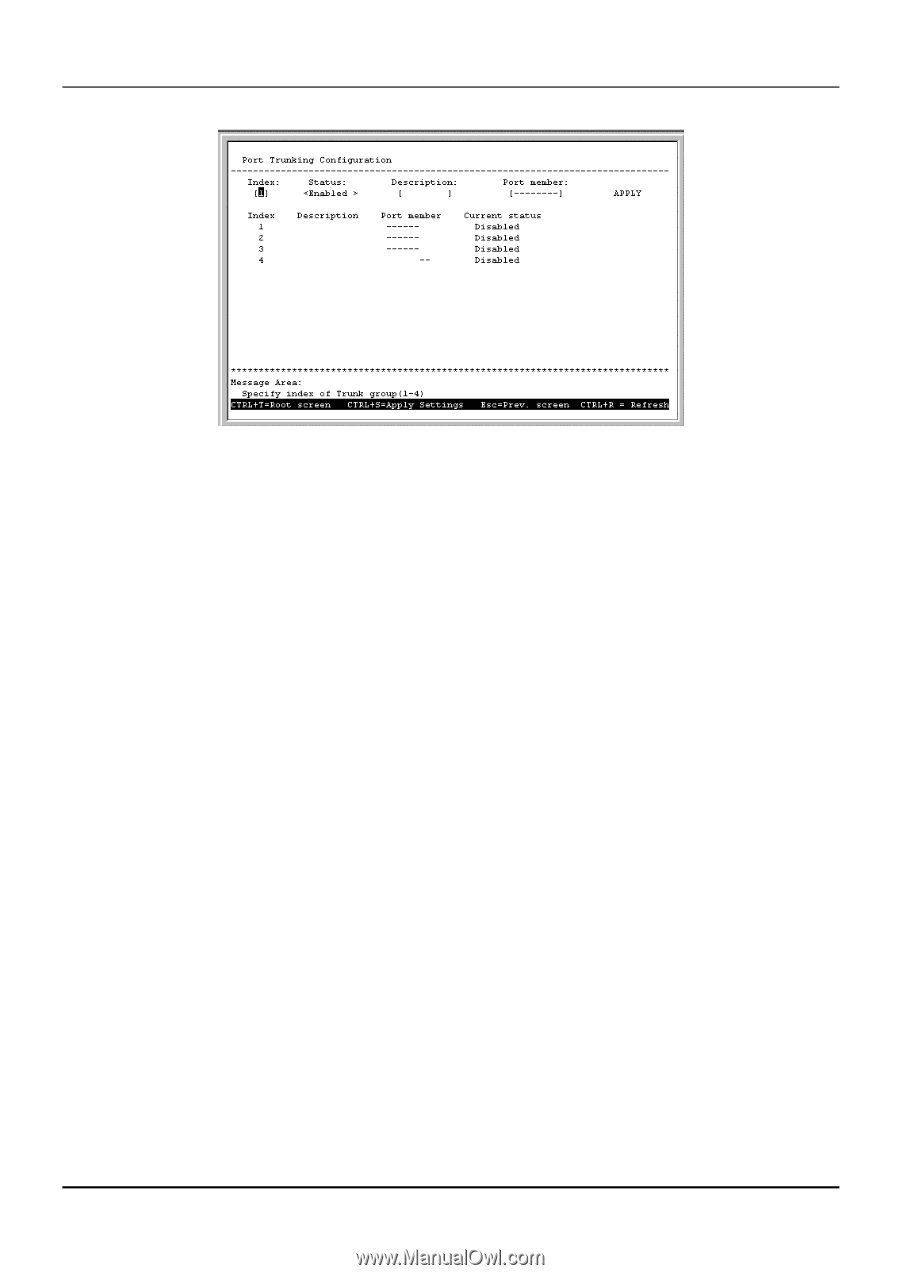
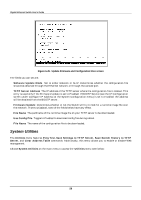
Gigabit Ethernet Switch User's Guide Figure 6-44. Port Trunking Configuration screen Please note that the maximum size for trunk groups 1 to 3 is 4 ports. Trunk group 4 is two ports. The fields you can set are: ♦ Index Enter the index number (1 through 4, as shown in this screen) that you wish to give the new entry, or the index number of the entry that you wish to remove. ♦ Status Use the space bar to toggle between Enabled and Disabled. This indicates whether you want to add or remove a trunk group. Be careful when removing trunk groups as the connections will return to normal operation, which may cause signal loops. ♦ Description Enter the desired group name. This can be any text string. ♦ Port Member Select two or more ports for this field. Use the arrow keys to move the cursor, and the V and hyphen keys to select and deselect ports. Press APPLY to make the changes take effect. The new settings will appear in the table at the bottom of this screen. Update Firmware and Configuration Files The Switch is capable of obtaining its boot-time configuration information, as well as updated versions of its internal firmware, using TFTP (the Trivial File Transfer Protocol) and BOOTP (the BOOTstrap Protocol). You can use the Update Firmware and Configuration Files screen to control this feature. Choose Update Firmware and Configuration Files on the Switch's main menu. The following screen appears: 57
-
 1
1 -
2
-
3
-
4
-
5
-
6
-
7
-
8
-
9
-
10
-
11
-
12
-
13
-
14
-
15
-
16
-
17
-
18
-
19
-
20
-
21
-
22
-
23
-
24
-
25
-
26
-
27
-
28
-
29
-
30
-
31
-
32
-
33
-
34
-
35
-
36
-
37
-
38
-
39
-
40
-
41
-
42
-
43
-
44
-
45
-
46
-
47
-
48
-
49
-
50
-
51
-
52
-
53
-
54
-
55
-
56
-
57
-
58
-
59
-
60
-
61
-
62
-
63
-
 64
64 -
 65
65 -
 66
66 -
 67
67 -
 68
68 -
 69
69 -
 70
70 -
 71
71 -
 72
72 -
 73
73 -
 74
74 -
75
-
76
-
77
-
78
-
79
-
80
-
81
-
82
-
83
-
84
-
85
-
86
-
87
-
88
-
89
-
90
-
91
-
92
-
93
-
94
-
95
-
96
-
97
-
98
-
99
-
100
-
101
-
102
-
103
-
104
-
105
-
106
-
107
-
108
-
109
-
110
-
111
-
112
-
113
-
114
-
115
-
116
-
117
-
118
-
119
-
120
-
121
-
122
-
123
-
124
-
125
-
126
-
127
-
128
-
129
-
130
-
131
-
132
-
133
-
134
-
135
-
136
 |
 |