Dell GX240 User's Guide - Page 111
Connecting Drives
 |
UPC - 683728165390
View all Dell GX240 manuals
Add to My Manuals
Save this manual to your list of manuals |
Page 111 highlights
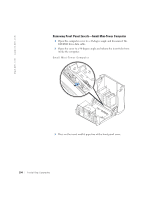
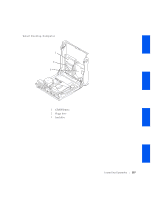
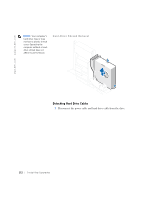
With the two IDE interface connectors on the system board, your computer supports up to two IDE devices. IDE hard drives should be connected to the IDE interface connector labeled "IDE1." (Always connect CD/DVD drives to the IDE interface connector labeled "IDE2.") Connecting Drives When you install a drive, you connect two cables-a DC power cable and an interface cable-to the back of the drive. Your drive's power input connector (to which you connect the DC power cable) resembles the following connector. Power Cable Connector 2 1 1 power cable 2 power input connector The drive's interface connector is a card-edge connector or a header connector, as shown in the following figure. Installing Upgrades 109
-
 1
1 -
2
-
3
-
4
-
5
-
6
-
7
-
8
-
9
-
10
-
11
-
12
-
13
-
14
-
15
-
16
-
17
-
18
-
19
-
20
-
21
-
22
-
23
-
24
-
25
-
26
-
27
-
28
-
29
-
30
-
31
-
32
-
33
-
34
-
35
-
36
-
37
-
38
-
39
-
40
-
41
-
42
-
43
-
44
-
45
-
46
-
47
-
48
-
49
-
50
-
51
-
52
-
53
-
54
-
55
-
56
-
57
-
58
-
59
-
60
-
61
-
62
-
63
-
64
-
65
-
66
-
67
-
68
-
69
-
70
-
71
-
72
-
73
-
74
-
75
-
76
-
77
-
78
-
79
-
80
-
81
-
82
-
83
-
84
-
85
-
86
-
87
-
88
-
89
-
90
-
91
-
92
-
93
-
94
-
95
-
96
-
97
-
98
-
99
-
100
-
101
-
102
-
103
-
104
-
105
-
 106
106 -
 107
107 -
 108
108 -
 109
109 -
 110
110 -
 111
111 -
 112
112 -
 113
113 -
 114
114 -
 115
115 -
 116
116 -
117
-
118
-
119
-
120
-
121
-
122
-
123
-
124
-
125
-
126
-
127
-
128
-
129
-
130
-
131
-
132
-
133
-
134
-
135
-
136
-
137
-
138
-
139
-
140
-
141
-
142
-
143
-
144
-
145
-
146
-
147
-
148
-
149
-
150
-
151
-
152
-
153
-
154
-
155
-
156
-
157
-
158
-
159
-
160
-
161
-
162
-
163
-
164
-
165
-
166
-
167
-
168
-
169
-
170
-
171
-
172
-
173
-
174
-
175
-
176
-
177
-
178
-
179
-
180
-
181
-
182
-
183
-
184
-
185
-
186
-
187
-
188
-
189
-
190
-
191
-
192
-
193
-
194
-
195
-
196
-
197
-
198
-
199
-
200
-
201
-
202
-
203
-
204
-
205
-
206
-
207
-
208
-
209
-
210
-
211
-
212
-
213
-
214
-
215
-
216
-
217
-
218
-
219
-
220
-
221
-
222
-
223
-
224
-
225
-
226
-
227
-
228
-
229
-
230
-
231
-
232
-
233
-
234
-
235
-
236
-
237
-
238
-
239
-
240
-
241
-
242
-
243
-
244
-
245
-
246
-
247
-
248
-
249
-
250
-
251
-
252
-
253
-
254
-
255
-
256
-
257
-
258
-
259
-
260
-
261
-
262
-
263
-
264
-
265
-
266
-
267
-
268
-
269
-
270
-
271
-
272
-
273
-
274
-
275
-
276
-
277
-
278
-
279
-
280
-
281
-
282
-
283
-
284
-
285
-
286
-
287
-
288
-
289
-
290
-
291
-
292
-
293
-
294
-
295
-
296
-
297
-
298
 |
 |

Installing Upgrades
109
With the two IDE interface connectors on the system board, your computer
supports up to two IDE devices. IDE hard drives should be connected to
the IDE interface connector labeled “IDE1.” (Always connect CD/DVD
drives to the IDE interface connector labeled “IDE2.”)
Connecting Drives
When you install a drive, you connect two cables—a DC power cable and
an interface cable—to the back of the drive. Your drive’s power input
connector (to which you connect the DC power cable) resembles the
following connector.
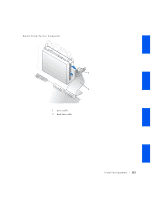
Power Cable Connector
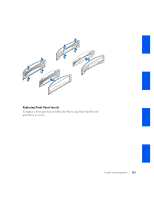
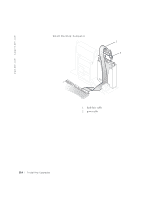
The drive’s interface connector is a card-edge connector or a header
connector, as shown in the following figure.
1
power cable
2
power input connector
2
1