Dell GX280DT User Guide - Page 122
heat sink assembly bracket
 |
UPC - 851846002006
View all Dell GX280DT manuals
Add to My Manuals
Save this manual to your list of manuals |
Page 122 highlights
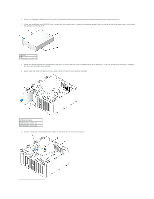
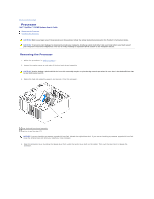
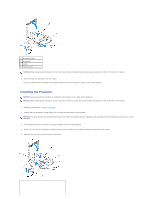
1 processor cover 6 release lever 2 tab 7 front alignment notch 3 processor 8 socket and processor pin-1 indicator 4 processor socket 9 rear alignment notch 5 center cover latch NOTICE: To avoid damage, ensure that the processor aligns properly with the socket, and do not use excessive force when you install the processor. 6. Set the processor lightly in the socket and ensure that the processor is positioned correctly. 7. When the processor is fully seated in the socket, close the processor cover. Ensure that the tab on the processor cover is positioned underneath the center cover latch on the socket. 8. Pivot the socket release lever back toward the socket and snap it into place to secure the processor. NOTICE: If you are not installing a processor upgrade kit from Dell, reuse the original heat sink assembly when you replace the processor. If you installed a processor replacement kit from Dell, return the original heat sink assembly and processor to Dell in the same package in which your replacement kit was sent. 9. Install the heat sink assembly: a. Place the heat sink assembly back onto the heat sink assembly bracket. b. Rotate the heat sink assembly down towards the computer base and tighten the two capture screws. NOTICE: Ensure that the heat sink is correctly seated and secure. 1 heat sink and fan shroud assembly 2 heat sink assembly bracket 3 captive screw housing (2) 10. Close the computer cover. NOTICE: To connect a network cable, first plug the cable into the network wall jack and then plug it into the computer. 11. Connect your computer and devices to electrical outlets, and turn them on. After you open and close the cover, the chassis intrusion detector, if installed and enabled, causes the following message to appear on the screen at the next computer start-up: ALERT! Cover was previously removed. 12. Reset the chassis intrusion detector by changing Chassis Intrusion to On or On-Silent. NOTE: If an admin password has been assigned by someone else, contact your network administrator for information on resetting the chassis intrusion detector.
-
 1
1 -
2
-
3
-
4
-
5
-
6
-
7
-
8
-
9
-
10
-
11
-
12
-
13
-
14
-
15
-
16
-
17
-
18
-
19
-
20
-
21
-
22
-
23
-
24
-
25
-
26
-
27
-
28
-
29
-
30
-
31
-
32
-
33
-
34
-
35
-
36
-
37
-
38
-
39
-
40
-
41
-
42
-
43
-
44
-
45
-
46
-
47
-
48
-
49
-
50
-
51
-
52
-
53
-
54
-
55
-
56
-
57
-
58
-
59
-
60
-
61
-
62
-
63
-
64
-
65
-
66
-
67
-
68
-
69
-
70
-
71
-
72
-
73
-
74
-
75
-
76
-
77
-
78
-
79
-
80
-
81
-
82
-
83
-
84
-
85
-
86
-
87
-
88
-
89
-
90
-
91
-
92
-
93
-
94
-
95
-
96
-
97
-
98
-
99
-
100
-
101
-
102
-
103
-
104
-
105
-
106
-
107
-
108
-
109
-
110
-
111
-
112
-
113
-
114
-
115
-
116
-
 117
117 -
 118
118 -
 119
119 -
 120
120 -
 121
121 -
 122
122 -
 123
123 -
 124
124 -
 125
125 -
 126
126 -
 127
127 -
128
-
129
-
130
-
131
-
132
-
133
-
134
-
135
-
136
-
137
-
138
-
139
-
140
-
141
-
142
-
143
-
144
-
145
-
146
-
147
-
148
-
149
-
150
-
151
-
152
-
153
-
154
-
155
-
156
-
157
-
158
-
159
-
160
-
161
-
162
-
163
-
164
-
165
-
166
-
167
-
168
-
169
-
170
-
171
-
172
-
173
-
174
-
175
-
176
-
177
-
178
-
179
-
180
-
181
-
182
-
183
-
184
-
185
-
186
-
187
-
188
-
189
-
190
-
191
-
192
-
193
-
194
-
195
-
196
-
197
-
198
-
199
-
200
-
201
-
202
-
203
-
204
-
205
-
206
-
207
-
208
-
209
-
210
-
211
-
212
-
213
-
214
-
215
-
216
-
217
-
218
-
219
-
220
-
221
-
222
-
223
-
224
-
225
-
226
-
227
-
228
-
229
-
230
-
231
-
232
-
233
-
234
-
235
-
236
-
237
-
238
-
239
-
240
-
241
-
242
-
243
-
244
-
245
-
246
-
247
-
248
-
249
-
250
-
251
-
252
-
253
-
254
-
255
-
256
-
257
-
258
-
259
-
260
-
261
-
262
-
263
-
264
-
265
-
266
-
267
-
268
-
269
-
270
-
271
-
272
-
273
-
274
-
275
-
276
-
277
-
278
-
279
-
280
-
281
-
282
-
283
-
284
-
285
-
286
-
287
-
288
-
289
 |
 |
