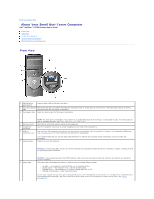
Dell GX280DT User Guide - Page 228
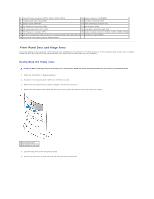
Front-Panel Door and Hinge Arms
 |
UPC - 851846002006
View all Dell GX280DT manuals
Add to My Manuals
Save this manual to your list of manuals |
Page 228 highlights
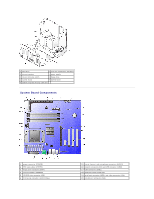
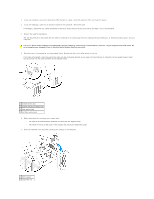
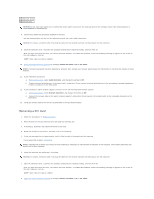
7 serial ATA drive connectors (SATA0, SATA1, SATA2, SATA3) 21 power connector (12VPOWER) 8 standby power light (AUX_PWR) 22 processor connector (CPU) 9 battery socket (BATTERY) 23 heat-sink/blower retention pad 10 PCI Express x16 connector (PEG) 24 fan connector (FAN) 11 PCI connectors (PCI0, PCI1, PCI2) 25 serial port 2 connector (SER_PS2) 12 PCI Express x1 connector (PE1) 26 memory module connectors (DIMM1, DIMM2, DIMM3, DIMM4) 13 CD drive analog audio cable connector for optional analog audio cable (CD_IN) 27 password jumper (PSWD) 14 front-panel audio cable connector (FRONTAUDIO) Front-Panel Door and Hinge Arms To prevent damage to your computer, the front-panel door is designed to "break away" if it is lifted up too far. If the front-panel door is open and it is pushed inward too hard, the hinge arms may also break away (the hinge arms are loose when they are detached). Reattaching the Hinge Arms CAUTION: Before you begin any of the procedures in this section, follow the safety instructions located in the Product Information Guide. 1. Follow the procedures in "Before You Begin." 2. Disconnect the computer power cable from the electrical outlet. 3. Remove the front-panel door by gently snapping it off the two hinge arms. 4. Remove the front-panel insert above the door bay area by pulling the bottom of the insert with your fingers. 1 front-panel insert 2 use fingers to pull here 5. Lift both hinge arms to the horizontal position. 6. Use the two view slots to align the pivot bar with the two pivot-bar slots.
-
 1
1 -
2
-
3
-
4
-
5
-
6
-
7
-
8
-
9
-
10
-
11
-
12
-
13
-
14
-
15
-
16
-
17
-
18
-
19
-
20
-
21
-
22
-
23
-
24
-
25
-
26
-
27
-
28
-
29
-
30
-
31
-
32
-
33
-
34
-
35
-
36
-
37
-
38
-
39
-
40
-
41
-
42
-
43
-
44
-
45
-
46
-
47
-
48
-
49
-
50
-
51
-
52
-
53
-
54
-
55
-
56
-
57
-
58
-
59
-
60
-
61
-
62
-
63
-
64
-
65
-
66
-
67
-
68
-
69
-
70
-
71
-
72
-
73
-
74
-
75
-
76
-
77
-
78
-
79
-
80
-
81
-
82
-
83
-
84
-
85
-
86
-
87
-
88
-
89
-
90
-
91
-
92
-
93
-
94
-
95
-
96
-
97
-
98
-
99
-
100
-
101
-
102
-
103
-
104
-
105
-
106
-
107
-
108
-
109
-
110
-
111
-
112
-
113
-
114
-
115
-
116
-
117
-
118
-
119
-
120
-
121
-
122
-
123
-
124
-
125
-
126
-
127
-
128
-
129
-
130
-
131
-
132
-
133
-
134
-
135
-
136
-
137
-
138
-
139
-
140
-
141
-
142
-
143
-
144
-
145
-
146
-
147
-
148
-
149
-
150
-
151
-
152
-
153
-
154
-
155
-
156
-
157
-
158
-
159
-
160
-
161
-
162
-
163
-
164
-
165
-
166
-
167
-
168
-
169
-
170
-
171
-
172
-
173
-
174
-
175
-
176
-
177
-
178
-
179
-
180
-
181
-
182
-
183
-
184
-
185
-
186
-
187
-
188
-
189
-
190
-
191
-
192
-
193
-
194
-
195
-
196
-
197
-
198
-
199
-
200
-
201
-
202
-
203
-
204
-
205
-
206
-
207
-
208
-
209
-
210
-
211
-
212
-
213
-
214
-
215
-
216
-
217
-
218
-
219
-
220
-
221
-
222
-
 223
223 -
 224
224 -
 225
225 -
 226
226 -
 227
227 -
 228
228 -
 229
229 -
 230
230 -
 231
231 -
 232
232 -
 233
233 -
234
-
235
-
236
-
237
-
238
-
239
-
240
-
241
-
242
-
243
-
244
-
245
-
246
-
247
-
248
-
249
-
250
-
251
-
252
-
253
-
254
-
255
-
256
-
257
-
258
-
259
-
260
-
261
-
262
-
263
-
264
-
265
-
266
-
267
-
268
-
269
-
270
-
271
-
272
-
273
-
274
-
275
-
276
-
277
-
278
-
279
-
280
-
281
-
282
-
283
-
284
-
285
-
286
-
287
-
288
-
289
 |
 |
