Dell GX280DT User Guide - Page 153
Replacing the System Board
 |
UPC - 851846002006
View all Dell GX280DT manuals
Add to My Manuals
Save this manual to your list of manuals |
Page 153 highlights
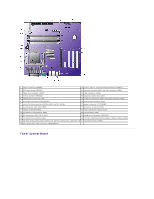
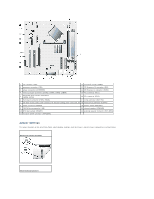
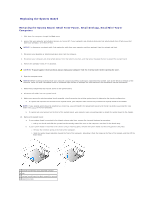
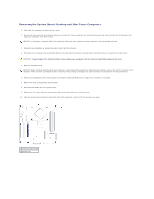
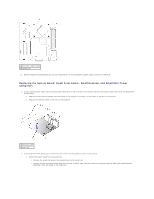
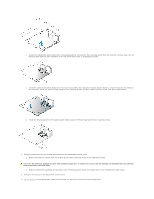
Replacing the System Board Removing the System Board: Small Form-Factor, Small Desktop, Small Mini-Tower Computers 1. Shut down the computer through the Start menu. 2. Ensure that your computer and attached devices are turned off. If your computer and attached devices did not automatically turn off when you shut down your computer, turn them off now. NOTICE: To disconnect a network cable, first unplug the cable from your computer and then unplug it from the network wall jack. 3. Disconnect any telephone or telecommunication lines from the computer. 4. Disconnect your computer and all attached devices from their electrical outlets, and then press the power button to ground the system board. 5. Remove the computer stand, if it is attached. CAUTION: To guard against electrical shock, always unplug your computer from the electrical outlet before opening the cover. 6. Open the computer cover. NOTICE: Before touching anything inside your computer, ground yourself by touching an unpainted metal surface, such as the metal at the back of the computer. While you work, periodically touch an unpainted metal surface to dissipate any static electricity that could harm internal components. 7. Remove any components that restrict access to the system board. 8. Disconnect all cables from the system board. 9. Before you remove the existing system board assembly, visually examine the existing system board to determine the chassis configuration: a. If a green tab is present on the front of the system board, your computer uses a metal tray to attach the system board to the chassis. NOTE: If your original system board is attached to a metal tray, you will transfer the replacement board to the metal tray before you install the new board. See step 1 in the next procedure. b. If a green tab is not present on the front of the system board, your computer uses a mounting plate to attach the system board to the chassis. 10. Remove the system board: a. If your system board is mounted to the chassis using a metal tray, remove the tray and the board as one piece: ¡ Pull up on the tab and slide the system board assembly toward the front of the computer, and then lift the board away. b. If your system board is mounted to the chassis using a mounting plate, remove the system board and mounting plate as one piece: ¡ Remove the retention screw at the front of the computer. ¡ Slide the system board assembly toward the front of the computer, detaching it from the hooks on the floor of the chassis, and then lift the board away. 1 system board/metal tray assembly removal 2 tab 3 system board/mounting plate assembly removal 4 retention screw
-
 1
1 -
2
-
3
-
4
-
5
-
6
-
7
-
8
-
9
-
10
-
11
-
12
-
13
-
14
-
15
-
16
-
17
-
18
-
19
-
20
-
21
-
22
-
23
-
24
-
25
-
26
-
27
-
28
-
29
-
30
-
31
-
32
-
33
-
34
-
35
-
36
-
37
-
38
-
39
-
40
-
41
-
42
-
43
-
44
-
45
-
46
-
47
-
48
-
49
-
50
-
51
-
52
-
53
-
54
-
55
-
56
-
57
-
58
-
59
-
60
-
61
-
62
-
63
-
64
-
65
-
66
-
67
-
68
-
69
-
70
-
71
-
72
-
73
-
74
-
75
-
76
-
77
-
78
-
79
-
80
-
81
-
82
-
83
-
84
-
85
-
86
-
87
-
88
-
89
-
90
-
91
-
92
-
93
-
94
-
95
-
96
-
97
-
98
-
99
-
100
-
101
-
102
-
103
-
104
-
105
-
106
-
107
-
108
-
109
-
110
-
111
-
112
-
113
-
114
-
115
-
116
-
117
-
118
-
119
-
120
-
121
-
122
-
123
-
124
-
125
-
126
-
127
-
128
-
129
-
130
-
131
-
132
-
133
-
134
-
135
-
136
-
137
-
138
-
139
-
140
-
141
-
142
-
143
-
144
-
145
-
146
-
147
-
 148
148 -
 149
149 -
 150
150 -
 151
151 -
 152
152 -
 153
153 -
 154
154 -
 155
155 -
 156
156 -
 157
157 -
 158
158 -
159
-
160
-
161
-
162
-
163
-
164
-
165
-
166
-
167
-
168
-
169
-
170
-
171
-
172
-
173
-
174
-
175
-
176
-
177
-
178
-
179
-
180
-
181
-
182
-
183
-
184
-
185
-
186
-
187
-
188
-
189
-
190
-
191
-
192
-
193
-
194
-
195
-
196
-
197
-
198
-
199
-
200
-
201
-
202
-
203
-
204
-
205
-
206
-
207
-
208
-
209
-
210
-
211
-
212
-
213
-
214
-
215
-
216
-
217
-
218
-
219
-
220
-
221
-
222
-
223
-
224
-
225
-
226
-
227
-
228
-
229
-
230
-
231
-
232
-
233
-
234
-
235
-
236
-
237
-
238
-
239
-
240
-
241
-
242
-
243
-
244
-
245
-
246
-
247
-
248
-
249
-
250
-
251
-
252
-
253
-
254
-
255
-
256
-
257
-
258
-
259
-
260
-
261
-
262
-
263
-
264
-
265
-
266
-
267
-
268
-
269
-
270
-
271
-
272
-
273
-
274
-
275
-
276
-
277
-
278
-
279
-
280
-
281
-
282
-
283
-
284
-
285
-
286
-
287
-
288
-
289
 |
 |
