Dell Precision 490 Desktop User's Guide - Page 119
Removing Memory, Installing Memory
 |
View all Dell Precision 490 Desktop manuals
Add to My Manuals
Save this manual to your list of manuals |
Page 119 highlights
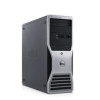
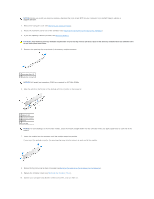
l PCI cards l Graphics card l PCI Express cards (if applicable) At start-up, the BIOS identifies the components that require address space. The BIOS dynamically calculates the amount of reserved address space required. The BIOS then subtracts the reserved address space from 4 GB to determine the amount of usable space. l If the total installed computer memory is less than the usable address space, all installed computer memory is available for use only by the operating system. l If the total installed computer memory is equal to or greater than the usable address space, a portion of installed memory is not available for use by the operating system. Removing Memory CAUTION: Before you begin any of the procedures in this section, follow the safety instructions in the Product Information Guide. NOTICE: If you remove your original memory modules from the computer during a memory upgrade, keep them separate from any new modules that you may have, even if you purchased the new modules from Dell. If possible, do not pair an original memory module with a new memory module. Otherwise, your computer may not start properly. NOTICE: To prevent static damage to components inside your computer, discharge static electricity from your body before you touch any of your computer's electronic components. You can do so by touching an unpainted metal surface on the computer chassis NOTE: Memory purchased from Dell is covered under your computer warranty. 1. Follow the procedures in Before You Begin. 2. Remove the computer cover (see Removing the Computer Cover). 3. Rotate the hard-drive carrier out of the computer (see Rotating the Hard-Drive Carrier Out of the Computer). CAUTION: Fully-buffered memory modules may become very hot during normal operation. Ensure that memory modules have had sufficient time to cool before you touch them. 4. Press out the securing clip at each end of the memory module connector. 1 memory module 2 securing clip (2) 5. Grasp the module and pull up to lift the memory module from the memory riser card. If a module is difficult to remove, gently ease it back and forth to remove it from the connector. 6. Rotate the hard-drive carrier back into place (see Rotating the Hard-Drive Carrier Back into the Computer). 7. Replace the computer cover (see Replacing the Computer Cover). Installing Memory CAUTION: Before you begin any of the procedures in this section, follow the safety instructions in the Product Information Guide. NOTICE: To prevent static damage to components inside your computer, discharge static electricity from your body before you touch any of your computer's electronic components. You can do so by touching an unpainted metal surface on the computer chassis. 1. Follow the procedures in Before You Begin.
-
 1
1 -
2
-
3
-
4
-
5
-
6
-
7
-
8
-
9
-
10
-
11
-
12
-
13
-
14
-
15
-
16
-
17
-
18
-
19
-
20
-
21
-
22
-
23
-
24
-
25
-
26
-
27
-
28
-
29
-
30
-
31
-
32
-
33
-
34
-
35
-
36
-
37
-
38
-
39
-
40
-
41
-
42
-
43
-
44
-
45
-
46
-
47
-
48
-
49
-
50
-
51
-
52
-
53
-
54
-
55
-
56
-
57
-
58
-
59
-
60
-
61
-
62
-
63
-
64
-
65
-
66
-
67
-
68
-
69
-
70
-
71
-
72
-
73
-
74
-
75
-
76
-
77
-
78
-
79
-
80
-
81
-
82
-
83
-
84
-
85
-
86
-
87
-
88
-
89
-
90
-
91
-
92
-
93
-
94
-
95
-
96
-
97
-
98
-
99
-
100
-
101
-
102
-
103
-
104
-
105
-
106
-
107
-
108
-
109
-
110
-
111
-
112
-
113
-
 114
114 -
 115
115 -
 116
116 -
 117
117 -
 118
118 -
 119
119 -
 120
120 -
 121
121 -
 122
122 -
 123
123 -
 124
124 -
125
-
126
-
127
-
128
-
129
-
130
-
131
-
132
-
133
-
134
-
135
-
136
-
137
-
138
-
139
-
140
-
141
-
142
-
143
-
144
-
145
-
146
-
147
-
148
-
149
-
150
-
151
-
152
-
153
-
154
-
155
-
156
-
157
-
158
-
159
-
160
-
161
-
162
-
163
-
164
-
165
-
166
-
167
-
168
-
169
-
170
 |
 |
