Dell Precision 490 Desktop User's Guide - Page 39
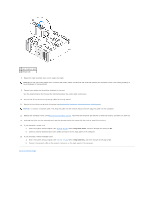
card retention door
 |
View all Dell Precision 490 Desktop manuals
Add to My Manuals
Save this manual to your list of manuals |
Page 39 highlights
Because the door is captive, it will remain in the open position. 1 release tab 2 card retention door 3 alignment bar alignment guide 4 NOTE: For extra security, remove the alignment guide (an upside-down screw) and screw it in right side up to secure a card. 5 filler bracket 5. Remove the card: a. If necessary, disconnect any cables connected to the card. b. If the card is full-length, press the release tab on the end of the alignment guides on the fan case. c. If the connector has a release tab, press the release tab as you grasp the card by its top corners, and ease it out of its connector. 6. If you are removing the card permanently, install a filler bracket in the empty card-slot opening. NOTE: Installing filler brackets over empty card-slot openings is necessary to maintain FCC certification of the computer. The brackets also keep dust and dirt out of your computer. 7. Before you close the card retention door, ensure that: l The tops of all cards and filler brackets are flush with the alignment bar. l The notch in the top of each card or filler bracket fits around the alignment guide. NOTE: For extra security, remove the alignment guide (an upside-down screw) and screw it in right side up to secure a card.
-
 1
1 -
2
-
3
-
4
-
5
-
6
-
7
-
8
-
9
-
10
-
11
-
12
-
13
-
14
-
15
-
16
-
17
-
18
-
19
-
20
-
21
-
22
-
23
-
24
-
25
-
26
-
27
-
28
-
29
-
30
-
31
-
32
-
33
-
 34
34 -
 35
35 -
 36
36 -
 37
37 -
 38
38 -
 39
39 -
 40
40 -
 41
41 -
 42
42 -
 43
43 -
 44
44 -
45
-
46
-
47
-
48
-
49
-
50
-
51
-
52
-
53
-
54
-
55
-
56
-
57
-
58
-
59
-
60
-
61
-
62
-
63
-
64
-
65
-
66
-
67
-
68
-
69
-
70
-
71
-
72
-
73
-
74
-
75
-
76
-
77
-
78
-
79
-
80
-
81
-
82
-
83
-
84
-
85
-
86
-
87
-
88
-
89
-
90
-
91
-
92
-
93
-
94
-
95
-
96
-
97
-
98
-
99
-
100
-
101
-
102
-
103
-
104
-
105
-
106
-
107
-
108
-
109
-
110
-
111
-
112
-
113
-
114
-
115
-
116
-
117
-
118
-
119
-
120
-
121
-
122
-
123
-
124
-
125
-
126
-
127
-
128
-
129
-
130
-
131
-
132
-
133
-
134
-
135
-
136
-
137
-
138
-
139
-
140
-
141
-
142
-
143
-
144
-
145
-
146
-
147
-
148
-
149
-
150
-
151
-
152
-
153
-
154
-
155
-
156
-
157
-
158
-
159
-
160
-
161
-
162
-
163
-
164
-
165
-
166
-
167
-
168
-
169
-
170
 |
 |
