Dell Precision 490 Desktop User's Guide - Page 120
Notice, Caution
 |
View all Dell Precision 490 Desktop manuals
Add to My Manuals
Save this manual to your list of manuals |
Page 120 highlights
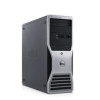
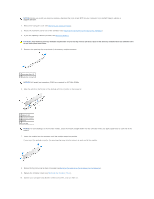
NOTICE: Before you install new memory modules, download the most recent BIOS for your computer from the Dell Support website at support.dell.com. 2. Remove the computer cover (see Removing the Computer Cover). 3. Rotate the hard-drive carrier out of the computer (see Rotating the Hard-Drive Carrier Out of the Computer). 4. If you are replacing a memory module, see Removing Memory. CAUTION: Fully-buffered memory modules may become very hot during normal operation. Ensure that memory modules have had sufficient time to cool before you touch them. 5. Press out the securing clip at each end of the memory module connector. 1 securing clips (2) 2 memory connector NOTICE: Full-length heat spreaders (FLHS) are required for 667 MHz DIMMs. 6. Align the notch on the bottom of the module with the crossbar in the connector. 1 cutouts (2) 2 memory module 3 notch 4 crossbar NOTICE: To avoid damage to the memory module, press the module straight down into the connector while you apply equal force to each end of the module. 7. Insert the module into the connector until the module snaps into position. If you insert the module correctly, the securing clips snap into the cutouts at each end of the module. 8. Rotate the hard-drive carrier back into place (see Rotating the Hard-Drive Carrier Back into the Computer). 9. Replace the computer cover (see Replacing the Computer Cover). 10. Connect your computer and devices to electrical outlets, and turn them on.
-
 1
1 -
2
-
3
-
4
-
5
-
6
-
7
-
8
-
9
-
10
-
11
-
12
-
13
-
14
-
15
-
16
-
17
-
18
-
19
-
20
-
21
-
22
-
23
-
24
-
25
-
26
-
27
-
28
-
29
-
30
-
31
-
32
-
33
-
34
-
35
-
36
-
37
-
38
-
39
-
40
-
41
-
42
-
43
-
44
-
45
-
46
-
47
-
48
-
49
-
50
-
51
-
52
-
53
-
54
-
55
-
56
-
57
-
58
-
59
-
60
-
61
-
62
-
63
-
64
-
65
-
66
-
67
-
68
-
69
-
70
-
71
-
72
-
73
-
74
-
75
-
76
-
77
-
78
-
79
-
80
-
81
-
82
-
83
-
84
-
85
-
86
-
87
-
88
-
89
-
90
-
91
-
92
-
93
-
94
-
95
-
96
-
97
-
98
-
99
-
100
-
101
-
102
-
103
-
104
-
105
-
106
-
107
-
108
-
109
-
110
-
111
-
112
-
113
-
114
-
 115
115 -
 116
116 -
 117
117 -
 118
118 -
 119
119 -
 120
120 -
 121
121 -
 122
122 -
 123
123 -
 124
124 -
 125
125 -
126
-
127
-
128
-
129
-
130
-
131
-
132
-
133
-
134
-
135
-
136
-
137
-
138
-
139
-
140
-
141
-
142
-
143
-
144
-
145
-
146
-
147
-
148
-
149
-
150
-
151
-
152
-
153
-
154
-
155
-
156
-
157
-
158
-
159
-
160
-
161
-
162
-
163
-
164
-
165
-
166
-
167
-
168
-
169
-
170
 |
 |
