Dell Precision 490 Desktop User's Guide - Page 32
Replacing the Computer Cover, System Setup, Back to Contents
 |
View all Dell Precision 490 Desktop manuals
Add to My Manuals
Save this manual to your list of manuals |
Page 32 highlights
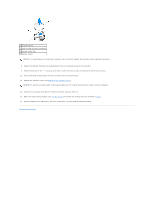
1 system battery 2 positive side of battery connector 3 battery socket tab 4 battery socket NOTICE: To avoid damage to the battery connector, you must firmly support the connector while replacing the battery. 8. Support the battery connector by pressing down firmly on the positive side of the connector. 9. Hold the battery with the "+" facing up, and slide it under the securing tabs at the positive side of the connector. 10. Press the battery straight down into the connector until it snaps into place. 11. Replace the computer cover (see Replacing the Computer Cover). NOTICE: To connect a network cable, first plug the cable into the network device and then plug it into the computer. 12. Connect your computer and devices to electrical outlets, and turn them on. 13. Enter the system setup program (see System Setup) and restore the settings that you recorded in step 1. 14. Properly dispose of the old battery. For more information, see your Product Information Guide. Back to Contents Page
-
 1
1 -
2
-
3
-
4
-
5
-
6
-
7
-
8
-
9
-
10
-
11
-
12
-
13
-
14
-
15
-
16
-
17
-
18
-
19
-
20
-
21
-
22
-
23
-
24
-
25
-
26
-
 27
27 -
 28
28 -
 29
29 -
 30
30 -
 31
31 -
 32
32 -
 33
33 -
 34
34 -
 35
35 -
 36
36 -
 37
37 -
38
-
39
-
40
-
41
-
42
-
43
-
44
-
45
-
46
-
47
-
48
-
49
-
50
-
51
-
52
-
53
-
54
-
55
-
56
-
57
-
58
-
59
-
60
-
61
-
62
-
63
-
64
-
65
-
66
-
67
-
68
-
69
-
70
-
71
-
72
-
73
-
74
-
75
-
76
-
77
-
78
-
79
-
80
-
81
-
82
-
83
-
84
-
85
-
86
-
87
-
88
-
89
-
90
-
91
-
92
-
93
-
94
-
95
-
96
-
97
-
98
-
99
-
100
-
101
-
102
-
103
-
104
-
105
-
106
-
107
-
108
-
109
-
110
-
111
-
112
-
113
-
114
-
115
-
116
-
117
-
118
-
119
-
120
-
121
-
122
-
123
-
124
-
125
-
126
-
127
-
128
-
129
-
130
-
131
-
132
-
133
-
134
-
135
-
136
-
137
-
138
-
139
-
140
-
141
-
142
-
143
-
144
-
145
-
146
-
147
-
148
-
149
-
150
-
151
-
152
-
153
-
154
-
155
-
156
-
157
-
158
-
159
-
160
-
161
-
162
-
163
-
164
-
165
-
166
-
167
-
168
-
169
-
170
 |
 |
