Dell Precision T5400 User's Guide - Page 187
Memory, Fully Buffered DIMM (FBD) Memory Overview
 |
View all Dell Precision T5400 manuals
Add to My Manuals
Save this manual to your list of manuals |
Page 187 highlights
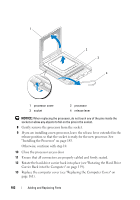
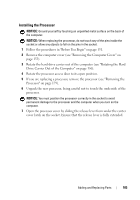
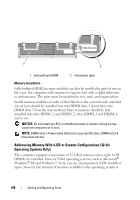
15 Ensure that all connectors are properly cabled and firmly seated. 16 Rotate the hard-drive carrier back into place (see "Rotating the Hard-Drive Carrier Back into the Computer" on page 159). 17 Replace the computer cover (see "Replacing the Computer Cover" on page 161). NOTICE: To connect a network cable, first plug the cable into the network port or device and then plug it into the computer. 18 Connect the computer and devices to electrical outlets, and turn them on. Memory Your computer supports fully-buffered ECC DDR2 memory only. For more information on the type of memory supported by your computer, see "Specifications" on page 36. NOTICE: Before you install new memory modules, download the most recent BIOS for your computer from the Dell Support website at support.dell.com. NOTE: Memory purchased from Dell is covered under your computer warranty. Fully Buffered DIMM (FBD) Memory Overview For optimal performance, fully buffered DIMMs (FBDs) should be installed in matched sets of four. This enables quad-channel operation and provides the highest memory bandwidth. The sets of four must be matched in size, rank, and organization. This information can normally be found on the FBD label. For example, the label of each FBD in a set of four might read: 1G 2R x8, in which 1G represents the size of the memory module, 2R represents the number of ranks, and x8 represents the organization. NOTICE: Full-length heat spreaders (FLHS) are required for 667 MHz DIMMs. Adding and Replacing Parts 187
-
 1
1 -
2
-
3
-
4
-
5
-
6
-
7
-
8
-
9
-
10
-
11
-
12
-
13
-
14
-
15
-
16
-
17
-
18
-
19
-
20
-
21
-
22
-
23
-
24
-
25
-
26
-
27
-
28
-
29
-
30
-
31
-
32
-
33
-
34
-
35
-
36
-
37
-
38
-
39
-
40
-
41
-
42
-
43
-
44
-
45
-
46
-
47
-
48
-
49
-
50
-
51
-
52
-
53
-
54
-
55
-
56
-
57
-
58
-
59
-
60
-
61
-
62
-
63
-
64
-
65
-
66
-
67
-
68
-
69
-
70
-
71
-
72
-
73
-
74
-
75
-
76
-
77
-
78
-
79
-
80
-
81
-
82
-
83
-
84
-
85
-
86
-
87
-
88
-
89
-
90
-
91
-
92
-
93
-
94
-
95
-
96
-
97
-
98
-
99
-
100
-
101
-
102
-
103
-
104
-
105
-
106
-
107
-
108
-
109
-
110
-
111
-
112
-
113
-
114
-
115
-
116
-
117
-
118
-
119
-
120
-
121
-
122
-
123
-
124
-
125
-
126
-
127
-
128
-
129
-
130
-
131
-
132
-
133
-
134
-
135
-
136
-
137
-
138
-
139
-
140
-
141
-
142
-
143
-
144
-
145
-
146
-
147
-
148
-
149
-
150
-
151
-
152
-
153
-
154
-
155
-
156
-
157
-
158
-
159
-
160
-
161
-
162
-
163
-
164
-
165
-
166
-
167
-
168
-
169
-
170
-
171
-
172
-
173
-
174
-
175
-
176
-
177
-
178
-
179
-
180
-
181
-
 182
182 -
 183
183 -
 184
184 -
 185
185 -
 186
186 -
 187
187 -
 188
188 -
 189
189 -
 190
190 -
 191
191 -
 192
192 -
193
-
194
-
195
-
196
-
197
-
198
-
199
-
200
-
201
-
202
-
203
-
204
-
205
-
206
-
207
-
208
-
209
-
210
-
211
-
212
-
213
-
214
-
215
-
216
-
217
-
218
-
219
-
220
-
221
-
222
-
223
-
224
-
225
-
226
-
227
-
228
-
229
-
230
-
231
-
232
-
233
-
234
-
235
-
236
-
237
-
238
-
239
-
240
-
241
-
242
-
243
-
244
-
245
-
246
-
247
-
248
-
249
-
250
-
251
-
252
-
253
-
254
-
255
-
256
-
257
-
258
-
259
-
260
-
261
-
262
-
263
-
264
-
265
-
266
-
267
-
268
-
269
-
270
-
271
-
272
-
273
-
274
-
275
-
276
-
277
-
278
-
279
-
280
-
281
-
282
-
283
-
284
-
285
-
286
-
287
-
288
-
289
-
290
-
291
-
292
-
293
-
294
-
295
-
296
-
297
-
298
-
299
-
300
-
301
-
302
-
303
-
304
-
305
-
306
-
307
-
308
-
309
-
310
-
311
-
312
-
313
-
314
-
315
-
316
 |
 |
