Dell Precision T5400 User's Guide - Page 214
Ensure that all connectors are properly cabled and firmly seated.
 |
View all Dell Precision T5400 manuals
Add to My Manuals
Save this manual to your list of manuals |
Page 214 highlights
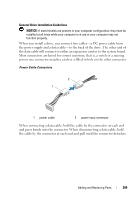
If you are going to install a replacement drive, see "Installing a Hard Drive into the Rotatable Carrier (Tower or Desktop Computer)" on page 215. 1 2 3 1 blue tabs (2) 3 secondary hard drive bay 2 hard drive in primary hard-drive bay 8 Ensure that all connectors are properly cabled and firmly seated. 9 Rotate the hard-drive carrier back into place (see "Rotating the Hard-Drive Carrier Back into the Computer" on page 159). 10 Replace the computer cover (see "Replacing the Computer Cover" on page 161). NOTICE: To connect a network cable, first plug the cable into the network port or device and then plug it into the computer. 11 Connect the computer and devices to electrical outlets, and turn them on. 214 Adding and Replacing Parts
-
 1
1 -
2
-
3
-
4
-
5
-
6
-
7
-
8
-
9
-
10
-
11
-
12
-
13
-
14
-
15
-
16
-
17
-
18
-
19
-
20
-
21
-
22
-
23
-
24
-
25
-
26
-
27
-
28
-
29
-
30
-
31
-
32
-
33
-
34
-
35
-
36
-
37
-
38
-
39
-
40
-
41
-
42
-
43
-
44
-
45
-
46
-
47
-
48
-
49
-
50
-
51
-
52
-
53
-
54
-
55
-
56
-
57
-
58
-
59
-
60
-
61
-
62
-
63
-
64
-
65
-
66
-
67
-
68
-
69
-
70
-
71
-
72
-
73
-
74
-
75
-
76
-
77
-
78
-
79
-
80
-
81
-
82
-
83
-
84
-
85
-
86
-
87
-
88
-
89
-
90
-
91
-
92
-
93
-
94
-
95
-
96
-
97
-
98
-
99
-
100
-
101
-
102
-
103
-
104
-
105
-
106
-
107
-
108
-
109
-
110
-
111
-
112
-
113
-
114
-
115
-
116
-
117
-
118
-
119
-
120
-
121
-
122
-
123
-
124
-
125
-
126
-
127
-
128
-
129
-
130
-
131
-
132
-
133
-
134
-
135
-
136
-
137
-
138
-
139
-
140
-
141
-
142
-
143
-
144
-
145
-
146
-
147
-
148
-
149
-
150
-
151
-
152
-
153
-
154
-
155
-
156
-
157
-
158
-
159
-
160
-
161
-
162
-
163
-
164
-
165
-
166
-
167
-
168
-
169
-
170
-
171
-
172
-
173
-
174
-
175
-
176
-
177
-
178
-
179
-
180
-
181
-
182
-
183
-
184
-
185
-
186
-
187
-
188
-
189
-
190
-
191
-
192
-
193
-
194
-
195
-
196
-
197
-
198
-
199
-
200
-
201
-
202
-
203
-
204
-
205
-
206
-
207
-
208
-
 209
209 -
 210
210 -
 211
211 -
 212
212 -
 213
213 -
 214
214 -
 215
215 -
 216
216 -
 217
217 -
 218
218 -
 219
219 -
220
-
221
-
222
-
223
-
224
-
225
-
226
-
227
-
228
-
229
-
230
-
231
-
232
-
233
-
234
-
235
-
236
-
237
-
238
-
239
-
240
-
241
-
242
-
243
-
244
-
245
-
246
-
247
-
248
-
249
-
250
-
251
-
252
-
253
-
254
-
255
-
256
-
257
-
258
-
259
-
260
-
261
-
262
-
263
-
264
-
265
-
266
-
267
-
268
-
269
-
270
-
271
-
272
-
273
-
274
-
275
-
276
-
277
-
278
-
279
-
280
-
281
-
282
-
283
-
284
-
285
-
286
-
287
-
288
-
289
-
290
-
291
-
292
-
293
-
294
-
295
-
296
-
297
-
298
-
299
-
300
-
301
-
302
-
303
-
304
-
305
-
306
-
307
-
308
-
309
-
310
-
311
-
312
-
313
-
314
-
315
-
316
 |
 |

214
Adding and Replacing Parts
If you are going to install a replacement drive, see "Installing a Hard Drive
into the Rotatable Carrier (Tower or Desktop Computer)" on page 215.
8
Ensure that all connectors are properly cabled and firmly seated.
9
Rotate the hard-drive carrier back into place (see "Rotating the Hard-Drive
Carrier Back into the Computer" on page 159).
10
Replace the computer cover (see "Replacing the Computer Cover" on
page 161).
NOTICE:
To connect a network cable, first plug the cable into the network port or
device and then plug it into the computer.
11
Connect the computer and devices to electrical outlets, and turn them on.
1
blue tabs (2)
2
hard drive in primary hard-drive bay
3
secondary hard drive bay
1
2
3