Dell V313W User's Guide - Page 92
Printer is printing blank s, ECONNECT, PRINTER, POWER, SUPPLY, EMOVE, CABLE, CONNECTED, REINSTALL - printhead replacement
 |
UPC - 884116016519
View all Dell V313W manuals
Add to My Manuals
Save this manual to your list of manuals |
Page 92 highlights
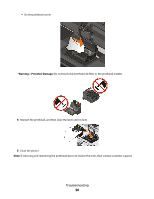
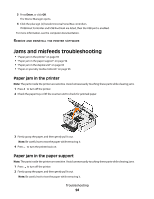
RECONNECT THE PRINTER POWER SUPPLY 1 Turn off the printer, and then unplug the power cord from the wall outlet. 2 Gently remove the power supply from the printer, and then reinsert it. 3 Plug the power cord into the wall outlet, and then turn on the printer. REMOVE AND RECONNECT THE USB CABLE CONNECTED TO YOUR PRINTER CHECK THE USB CONNECTION 1 Check the USB cable for any obvious damage. If the cable is damaged, then use a new one. 2 Firmly plug the square end of the USB cable into the back of the printer. 3 Firmly plug the rectangular end of the USB cable into the USB port of the computer. The USB port is marked with a USB symbol. Note: If you continue to have problems, then try another USB port on the computer. You may have connected to a defective port. REMOVE AND REINSTALL THE PRINTER SOFTWARE Printer is printing blank pages Blank pages may be caused by improperly installed ink cartridges. REINSTALL THE INK CARTRIDGES AND DEEP CLEAN AND ALIGN THE PRINTHEAD 1 Reinstall the ink cartridges. See "Replacing ink cartridges" on page 11 for more information. If the cartridges do not seem to fit, make sure the printhead is properly seated, and then try installing the cartridges again. 2 Load plain paper. 3 From the printer control panel, press . 4 Press the arrow buttons to scroll to Maintenance, and then press . 5 Press the arrow buttons to scroll to Deep Clean Printhead, and then press . A cleaning page prints. 6 Press the arrow buttons to scroll to Align Printer, and the press . An alignment page prints. Notes: • Do not remove the alignment page until printing is finished. • Do not perform consecutive deep cleaning. • Contact technical support if the problem persists after a deep cleaning. Troubleshooting 92
-
 1
1 -
2
-
3
-
4
-
5
-
6
-
7
-
8
-
9
-
10
-
11
-
12
-
13
-
14
-
15
-
16
-
17
-
18
-
19
-
20
-
21
-
22
-
23
-
24
-
25
-
26
-
27
-
28
-
29
-
30
-
31
-
32
-
33
-
34
-
35
-
36
-
37
-
38
-
39
-
40
-
41
-
42
-
43
-
44
-
45
-
46
-
47
-
48
-
49
-
50
-
51
-
52
-
53
-
54
-
55
-
56
-
57
-
58
-
59
-
60
-
61
-
62
-
63
-
64
-
65
-
66
-
67
-
68
-
69
-
70
-
71
-
72
-
73
-
74
-
75
-
76
-
77
-
78
-
79
-
80
-
81
-
82
-
83
-
84
-
85
-
86
-
 87
87 -
 88
88 -
 89
89 -
 90
90 -
 91
91 -
 92
92 -
 93
93 -
 94
94 -
 95
95 -
 96
96 -
 97
97 -
98
-
99
-
100
-
101
-
102
-
103
-
104
-
105
-
106
-
107
-
108
-
109
-
110
-
111
-
112
-
113
-
114
-
115
-
116
-
117
-
118
-
119
-
120
-
121
-
122
-
123
-
124
-
125
-
126
-
127
-
128
-
129
-
130
-
131
-
132
-
133
-
134
-
135
 |
 |