Dell Vostro 1510 Service Manual - Page 34
Battery Latch Assembly
 |
View all Dell Vostro 1510 manuals
Add to My Manuals
Save this manual to your list of manuals |
Page 34 highlights
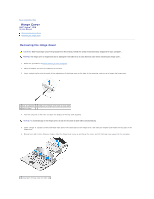
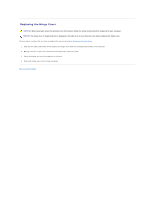
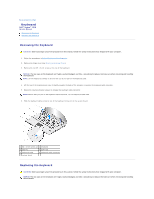
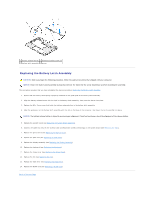
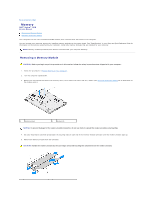
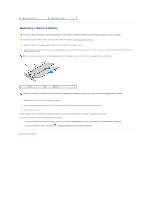
Back to Contents Page Battery Latch Assembly Dell™ Vostro™ 1510 Service Manual Removing the Battery Latch Assembly Replacing the Battery Latch Assembly Removing the Battery Latch Assembly CAUTION: Before you begin the following procedure, follow the safety instructions that shipped with your computer. 1. Follow the instructions in Before Working on Your Computer. 2. Remove the hard drive (see Removing the Hard Drive). 3. Remove the WLAN card (see Removing a WLAN Card). 4. Remove the fan (see Removing the Fan). 5. Remove the hinge cover (see Removing the Hinge Cover). 6. Remove the keyboard (see Removing the Keyboard). 7. Remove the display assembly (see Removing the Display Assembly). 8. Remove the palm rest (see Removing the Palm Rest). 9. Disconnect the cable that secures the internal card with Bluetooth® wireless technology to the system board (see Removing the Card). 10. Remove the optical drive (see Removing the Optical Drive). 11. Remove the system board (see Removing the System Board Assembly). 12. Remove the battery latch spring. NOTICE: The battery-latch assembly spring is not secured to the latch assembly and can be easily misplaced. When removing the battery latch assembly, place the spring in a secure location until the latch is ready to be reinstalled. 13. Remove the screw securing the battery latch to the base of the system. 14. Lift the edge of the battery latch. 15. Remove the battery latch from the system. 16. Squeeze the securing clips on the battery lock latch together. 17. Remove the battery lock latch. NOTICE: Before you remove the battery release button, observe the orientation of the button to ensure proper installation when the button is replaced.
-
 1
1 -
2
-
3
-
4
-
5
-
6
-
7
-
8
-
9
-
10
-
11
-
12
-
13
-
14
-
15
-
16
-
17
-
18
-
19
-
20
-
21
-
22
-
23
-
24
-
25
-
26
-
27
-
28
-
 29
29 -
 30
30 -
 31
31 -
 32
32 -
 33
33 -
 34
34 -
 35
35 -
 36
36 -
 37
37 -
 38
38 -
 39
39 -
40
-
41
-
42
-
43
-
44
-
45
-
46
-
47
-
48
-
49
-
50
-
51
-
52
-
53
-
54
-
55
-
56
-
57
-
58
-
59
-
60
-
61
-
62
 |
 |