Dell Vostro 1510 Service Manual - Page 43
Notice, Caution - touchpad not working
 |
View all Dell Vostro 1510 manuals
Add to My Manuals
Save this manual to your list of manuals |
Page 43 highlights
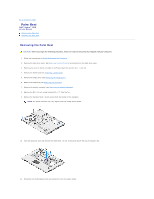
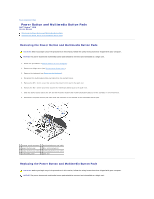
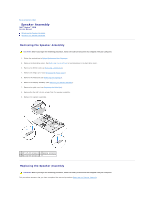
12. Disconnect the touch pad connector from the system board. 13. Disconnect the fingerprint reader connector from the system board. NOTICE: Do not use force to separate the palm rest from the computer. If you encounter resistance, gently flex or apply pressure to the palm rest, or move along the edge, working away from the area of resistance, until the palm rest is free. 14. Disconnect the speaker connector from the palm rest. Remove tape as necessary. 15. Moving from left to right, carefully lift the palm rest along the rear edge, near the hinge brackets, and gently lift the palm rest. 1 speaker connector 2 touch pad connector 3 fingerprint reader connector 4 computer base 5 multimedia panel connector 6 palm rest Replacing the Palm Rest CAUTION: Before you begin the following procedure, follow the safety instructions that shipped with your computer. NOTICE: Ensure that the touch pad cable and the cable for the internal card with Bluetooth® wireless technology are properly routed before snapping the palm rest into place. This procedure assumes that you have completed the removal procedure Removing the Palm Rest. 1. Align the palm rest with the computer base and gently snap it into place. 2. Connect the speaker connector to the under side of the palm rest. 3. Connect the touchpad connector to the system board. 4. Connect the multimedia-button pad connector to the system board. 5. Connect the finger print reader connector to the system board. 6. Replace the three M2.5 x 5-mm screws on the top of the palm rest. 7. Turn the computer upside down and replace the fourteen M2.5 x 8-mm screws on the bottom of the computer to secure the palm rest. 8. Replace the M2.5 x 5-mm screw in the hole labeled with a "P" on the fan. 9. Replace the display assembly (see Replacing the Display Assembly). 10. Replace the keyboard (see Replacing the Keyboard).
-
 1
1 -
2
-
3
-
4
-
5
-
6
-
7
-
8
-
9
-
10
-
11
-
12
-
13
-
14
-
15
-
16
-
17
-
18
-
19
-
20
-
21
-
22
-
23
-
24
-
25
-
26
-
27
-
28
-
29
-
30
-
31
-
32
-
33
-
34
-
35
-
36
-
37
-
 38
38 -
 39
39 -
 40
40 -
 41
41 -
 42
42 -
 43
43 -
 44
44 -
 45
45 -
 46
46 -
 47
47 -
 48
48 -
49
-
50
-
51
-
52
-
53
-
54
-
55
-
56
-
57
-
58
-
59
-
60
-
61
-
62
 |
 |
