Dell Vostro 1510 Service Manual - Page 50
Caution, Notice - update
 |
View all Dell Vostro 1510 manuals
Add to My Manuals
Save this manual to your list of manuals |
Page 50 highlights
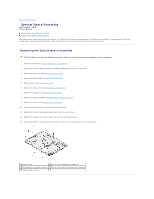
Replacing the System Board Assembly CAUTION: Before you begin the following procedure, follow the safety instructions that shipped with your computer. NOTICE: Ensure that any loose cables do not get caught beneath the system board. This procedure assumes that you have completed the removal procedure Removing the System Board Assembly. 1. Insert the left side of the system board into the base of the computer at an angle until the connectors on the system board are aligned with the holes on the base of the computer, then carefully lower the system board into place. 2. Replace the three M2.5 x 5-mm screws on the system board. 3. Connect the 1394/USB daughter-card cable to the connector on the system board. 4. Replace the optical drive (see Replacing the Optical Drive). 5. Replace the palm rest (see Replacing the Palm Rest). 6. Replace the display assembly (see Replacing the Display Assembly). 7. Replace the keyboard (see Replacing the Keyboard). 8. Replace the hinge cover (see Replacing the Hinge Cover). 9. Replace the fan (see Replacing the Fan). 10. Replace the WLAN card (see Replacing a WLAN Card). 11. Replace the hard drive (see Replacing the Hard Drive). 12. Replace any blanks you removed from the ExpressCard slot and the 8-in-1 card slot. NOTICE: Before turning on the computer, replace all screws and ensure that no stray screws remain inside the computer. Failure to do so may result in damage to the computer. 13. Turn on the computer. NOTE: If you use a BIOS update program media to flash the BIOS, press before inserting the media in order to set the computer to boot from the media for one time only. Otherwise, you must enter the system setup program to change the default boot order. 14. Flash update the BIOS (see Flashing the BIOS for more information). 15. Enter the system setup program to update the BIOS on the new system board with the computer Service Tag. For information on the system setup program, see the Dell™ Technology Guide on your computer or at support.dell.com. Back to Contents Page
-
 1
1 -
2
-
3
-
4
-
5
-
6
-
7
-
8
-
9
-
10
-
11
-
12
-
13
-
14
-
15
-
16
-
17
-
18
-
19
-
20
-
21
-
22
-
23
-
24
-
25
-
26
-
27
-
28
-
29
-
30
-
31
-
32
-
33
-
34
-
35
-
36
-
37
-
38
-
39
-
40
-
41
-
42
-
43
-
44
-
 45
45 -
 46
46 -
 47
47 -
 48
48 -
 49
49 -
 50
50 -
 51
51 -
 52
52 -
 53
53 -
 54
54 -
 55
55 -
56
-
57
-
58
-
59
-
60
-
61
-
62
 |
 |