Epson Stylus Pro 7600 - UltraChrome Ink Service Manual - Page 247
Head motion by Head Adjustment Lever operation
 |
View all Epson Stylus Pro 7600 - UltraChrome Ink manuals
Add to My Manuals
Save this manual to your list of manuals |
Page 247 highlights
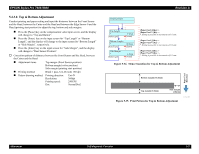
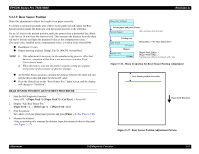
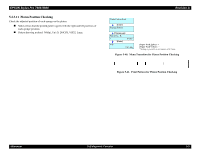
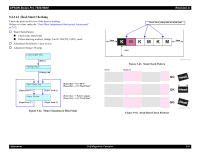
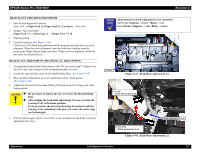
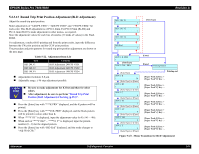
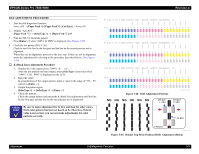
EPSON Stylus Pro 7600/9600 HEAD SLANT CHECKING PROCEDURE 1. Start the Self-diagnostic Function: Power OFF → [Paper Feed ∆]+[Paper Feed ∇]+[Cut/Eject] → Power ON 2. Display "Adj: Head Slant": [Paper Feed ∇] → [SelecType >] → [Paper Feed ∇] x8 3. Print the pattern. 4. Check the pattern: (See Figure 5-43) Check to see if the black horizontal lines and the magenta horizontal lines are not in alignment. When they are in alignment, leave the head slant checking mode by pressing the [Paper Source] button two times. If they are not in alignment, follow the procedure as described below. HEAD SLANT ADJUSTMENT (MECHANICAL ADJUSTMENT) 1. After printing the head slant check pattern, with "Do you correct slant?" displayed on the LCD, move the Carriage Unit to an appropriate place for work. 2. Loosen the right and left screws for the Head Holding Plate. (See Figure 5-45) 3. Move the Head Adjustment Lever in consideration of the output pattern. (See Figure 5-46) 4. Tighten the left screw for the Head Holding Plate and move the Carriage Unit to the home position. C A U T IO N „ Do not forget to tighten the two screws for the Head Holding Plate. „ After making the head slant adjustment, be sure to return the Carriage Unit to the home position. If you proceed to the next step (Printing the pattern) with the Carriage Unit remaining in the place for work, the cutter edge can be damaged. 5. Print the pattern again, check to see if there is any misalignment and if any, repeat the adjustment from step 1. Revision A CHECK P O IN T Head motion by Head Adjustment Lever operation: Lever Up: Magenta → lower / Black → rise Lever Down: Magenta → rise / Black → lower Tighten two screws Cutter Figure 5-45. Head Slant Adjustment 1/2 Lever up → Black down/magenta up Head Adjustment Lever Lever down → Black up/magenta down Figure 5-46. Head Slant Adjustment 2/2 Adjustment Self-diagnostic Function 247
-
 1
1 -
2
-
3
-
4
-
5
-
6
-
7
-
8
-
9
-
10
-
11
-
12
-
13
-
14
-
15
-
16
-
17
-
18
-
19
-
20
-
21
-
22
-
23
-
24
-
25
-
26
-
27
-
28
-
29
-
30
-
31
-
32
-
33
-
34
-
35
-
36
-
37
-
38
-
39
-
40
-
41
-
42
-
43
-
44
-
45
-
46
-
47
-
48
-
49
-
50
-
51
-
52
-
53
-
54
-
55
-
56
-
57
-
58
-
59
-
60
-
61
-
62
-
63
-
64
-
65
-
66
-
67
-
68
-
69
-
70
-
71
-
72
-
73
-
74
-
75
-
76
-
77
-
78
-
79
-
80
-
81
-
82
-
83
-
84
-
85
-
86
-
87
-
88
-
89
-
90
-
91
-
92
-
93
-
94
-
95
-
96
-
97
-
98
-
99
-
100
-
101
-
102
-
103
-
104
-
105
-
106
-
107
-
108
-
109
-
110
-
111
-
112
-
113
-
114
-
115
-
116
-
117
-
118
-
119
-
120
-
121
-
122
-
123
-
124
-
125
-
126
-
127
-
128
-
129
-
130
-
131
-
132
-
133
-
134
-
135
-
136
-
137
-
138
-
139
-
140
-
141
-
142
-
143
-
144
-
145
-
146
-
147
-
148
-
149
-
150
-
151
-
152
-
153
-
154
-
155
-
156
-
157
-
158
-
159
-
160
-
161
-
162
-
163
-
164
-
165
-
166
-
167
-
168
-
169
-
170
-
171
-
172
-
173
-
174
-
175
-
176
-
177
-
178
-
179
-
180
-
181
-
182
-
183
-
184
-
185
-
186
-
187
-
188
-
189
-
190
-
191
-
192
-
193
-
194
-
195
-
196
-
197
-
198
-
199
-
200
-
201
-
202
-
203
-
204
-
205
-
206
-
207
-
208
-
209
-
210
-
211
-
212
-
213
-
214
-
215
-
216
-
217
-
218
-
219
-
220
-
221
-
222
-
223
-
224
-
225
-
226
-
227
-
228
-
229
-
230
-
231
-
232
-
233
-
234
-
235
-
236
-
237
-
238
-
239
-
240
-
241
-
 242
242 -
 243
243 -
 244
244 -
 245
245 -
 246
246 -
 247
247 -
 248
248 -
 249
249 -
 250
250 -
 251
251 -
 252
252 -
253
-
254
-
255
-
256
-
257
-
258
-
259
-
260
-
261
-
262
-
263
-
264
-
265
-
266
-
267
-
268
-
269
-
270
-
271
-
272
-
273
-
274
-
275
-
276
-
277
-
278
-
279
-
280
-
281
-
282
-
283
-
284
-
285
-
286
-
287
-
288
-
289
-
290
-
291
-
292
-
293
-
294
-
295
-
296
-
297
-
298
-
299
-
300
-
301
-
302
-
303
-
304
-
305
-
306
-
307
-
308
-
309
-
310
-
311
-
312
-
313
-
314
-
315
-
316
-
317
-
318
-
319
-
320
-
321
-
322
-
323
-
324
-
325
-
326
-
327
-
328
-
329
-
330
-
331
-
332
-
333
-
334
-
335
-
336
 |
 |