Epson Stylus Pro 7600 - UltraChrome Ink Service Manual - Page 270
Cutter Holder ASSY height adjustment
 |
View all Epson Stylus Pro 7600 - UltraChrome Ink manuals
Add to My Manuals
Save this manual to your list of manuals |
Page 270 highlights
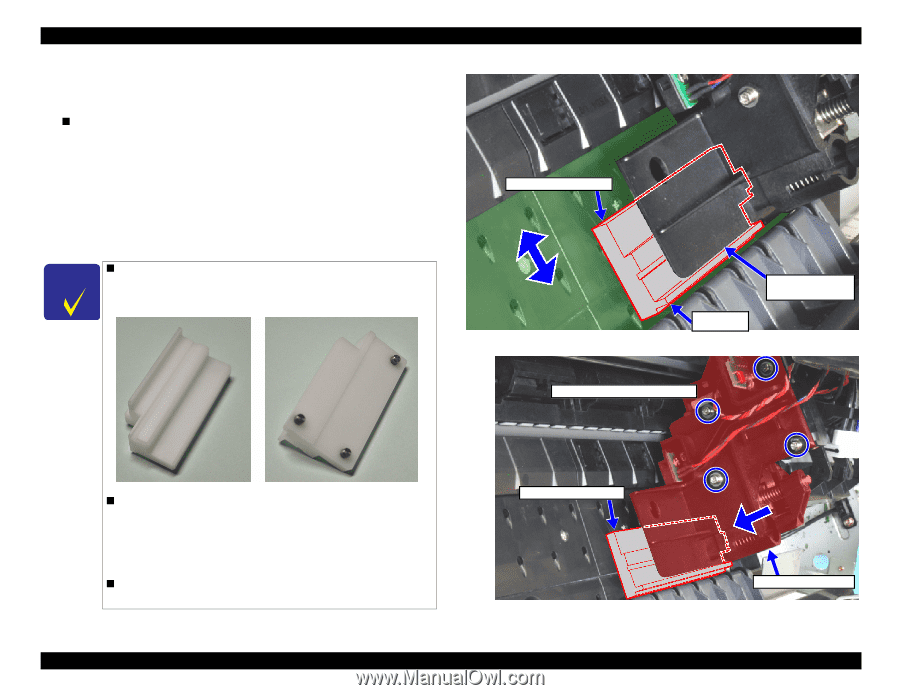
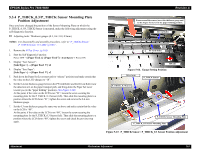
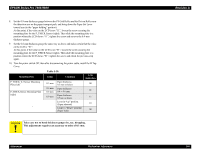
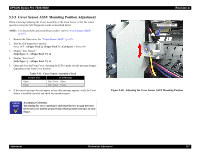
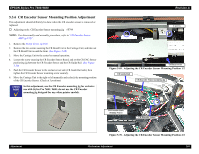
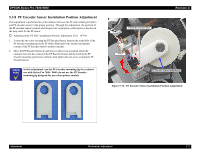
EPSON Stylus Pro 7600/9600 5. Slide the CR Unit onto the cutter positioning jig, shift the Paper Guide L up or down to a position where the plate of the Cutter Holder ASSY comes in contact with the projection in the lower part of the jig, and tighten the screw. „ For replacement of Cutter Solenoid ASSY: After completion of the Paper Guide L up and down adjustment, loosen the four screws securing the Cutter Holder ASSY to the CR Unit, press the front end of the Cutter Holder ASSY gently against the tool and tighten the four screws. (See Figure 5-74) 6. Set the jig at the left end of the Paper Guide L and make the same adjustment and checking as step 4 ~ 5 above. 7. Move the carriage to around the center and make checking again. CHECK P O IN T „ In this adjustment, use the cutter positioning jig for exclusive use with Stylus Pro 7600 / 9600: do not use the cutter positioning jig designed for any other printer models. Revision A Cutter positioning jig Plate of Cutter Holder ASSY Projection Figure 5-73. Paper Guide L up and down adjustment Cutter Holder securing screws x4 „ The positions where to set the jig for checking and adjustment should be the right and left ends as close to the frame as possible. At any position where the Paper Guide L is not supported, the adjustment can not be made properly because of a deflection of the Paper Guide L. „ After successful completion of the adjustment above, proceed to the next item "Paper Cutting Position Check" (p.271). Cutter positioning jig Cutter Holder ASSY Figure 5-74. Cutter Holder ASSY height adjustment Adjustment Mechanism Adjustment 270
-
 1
1 -
2
-
3
-
4
-
5
-
6
-
7
-
8
-
9
-
10
-
11
-
12
-
13
-
14
-
15
-
16
-
17
-
18
-
19
-
20
-
21
-
22
-
23
-
24
-
25
-
26
-
27
-
28
-
29
-
30
-
31
-
32
-
33
-
34
-
35
-
36
-
37
-
38
-
39
-
40
-
41
-
42
-
43
-
44
-
45
-
46
-
47
-
48
-
49
-
50
-
51
-
52
-
53
-
54
-
55
-
56
-
57
-
58
-
59
-
60
-
61
-
62
-
63
-
64
-
65
-
66
-
67
-
68
-
69
-
70
-
71
-
72
-
73
-
74
-
75
-
76
-
77
-
78
-
79
-
80
-
81
-
82
-
83
-
84
-
85
-
86
-
87
-
88
-
89
-
90
-
91
-
92
-
93
-
94
-
95
-
96
-
97
-
98
-
99
-
100
-
101
-
102
-
103
-
104
-
105
-
106
-
107
-
108
-
109
-
110
-
111
-
112
-
113
-
114
-
115
-
116
-
117
-
118
-
119
-
120
-
121
-
122
-
123
-
124
-
125
-
126
-
127
-
128
-
129
-
130
-
131
-
132
-
133
-
134
-
135
-
136
-
137
-
138
-
139
-
140
-
141
-
142
-
143
-
144
-
145
-
146
-
147
-
148
-
149
-
150
-
151
-
152
-
153
-
154
-
155
-
156
-
157
-
158
-
159
-
160
-
161
-
162
-
163
-
164
-
165
-
166
-
167
-
168
-
169
-
170
-
171
-
172
-
173
-
174
-
175
-
176
-
177
-
178
-
179
-
180
-
181
-
182
-
183
-
184
-
185
-
186
-
187
-
188
-
189
-
190
-
191
-
192
-
193
-
194
-
195
-
196
-
197
-
198
-
199
-
200
-
201
-
202
-
203
-
204
-
205
-
206
-
207
-
208
-
209
-
210
-
211
-
212
-
213
-
214
-
215
-
216
-
217
-
218
-
219
-
220
-
221
-
222
-
223
-
224
-
225
-
226
-
227
-
228
-
229
-
230
-
231
-
232
-
233
-
234
-
235
-
236
-
237
-
238
-
239
-
240
-
241
-
242
-
243
-
244
-
245
-
246
-
247
-
248
-
249
-
250
-
251
-
252
-
253
-
254
-
255
-
256
-
257
-
258
-
259
-
260
-
261
-
262
-
263
-
264
-
 265
265 -
 266
266 -
 267
267 -
 268
268 -
 269
269 -
 270
270 -
 271
271 -
 272
272 -
 273
273 -
 274
274 -
 275
275 -
276
-
277
-
278
-
279
-
280
-
281
-
282
-
283
-
284
-
285
-
286
-
287
-
288
-
289
-
290
-
291
-
292
-
293
-
294
-
295
-
296
-
297
-
298
-
299
-
300
-
301
-
302
-
303
-
304
-
305
-
306
-
307
-
308
-
309
-
310
-
311
-
312
-
313
-
314
-
315
-
316
-
317
-
318
-
319
-
320
-
321
-
322
-
323
-
324
-
325
-
326
-
327
-
328
-
329
-
330
-
331
-
332
-
333
-
334
-
335
-
336
 |
 |