Epson WorkForce 630 User Manual - Page 23
Scanning a Document or Photo, Quick Scanning With the Scan Button
 |
View all Epson WorkForce 630 manuals
Add to My Manuals
Save this manual to your list of manuals |
Page 23 highlights
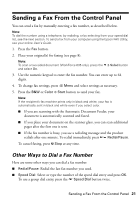
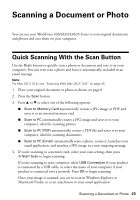
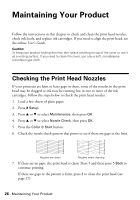
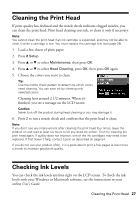
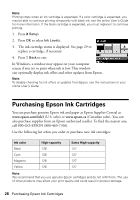
Scanning a Document or Photo You can use your WorkForce 630/632/633/635 Series to scan original documents and photos and save them on your computer. Quick Scanning With the Scan Button Use the Scan button to quickly scan a photo or document and save it on your computer. You can even scan a photo and have it automatically included in an email message. Note: For Mac OS X 10.6, see "Scanning With Mac OS X 10.6" on page 25. 1. Place your original document or photo as shown on page 8. 2. Press the Scan button. 3. Press u or d to select one of the following options: ■ Scan to Memory Card automatically creates a JPG image or PDF and saves it to an inserted memory card ■ Scan to PC automatically creates a JPG image and saves it to your computer; ideal for scanning photos ■ Scan to PC (PDF) automatically creates a PDF file and saves it to your computer; ideal for scanning documents ■ Scan to PC (Email) automatically scans a photo, resizes it, launches your email application, and attaches a JPG image to a new outgoing message 4. If you're scanning to a memory card, select your scan settings then press x Start Scan to begin scanning. If you're scanning to your computer, select USB Connection if your product is connected by a USB cable, or select the name of your computer if your product is connected over a network. Press OK to begin scanning. Once your image is scanned, you see its icon in Windows Explorer or Macintosh Finder, or as an attachment in your email application. Scanning a Document or Photo 23
-
 1
1 -
2
-
3
-
4
-
5
-
6
-
7
-
8
-
9
-
10
-
11
-
12
-
13
-
14
-
15
-
16
-
17
-
 18
18 -
 19
19 -
 20
20 -
 21
21 -
 22
22 -
 23
23 -
 24
24 -
 25
25 -
 26
26 -
 27
27 -
 28
28 -
29
-
30
-
31
-
32
-
33
-
34
-
35
-
36
-
37
-
38
-
39
-
40
-
41
-
42
-
43
-
44
-
45
-
46
-
47
-
48
-
49
-
50
-
51
-
52
-
53
-
54
-
55
-
56
-
57
-
58
-
59
-
60
-
61
-
62
-
63
-
64
 |
 |