Garmin RINO 130 Owner's Manual - Page 42
To calibrate the Electronic Compass, To turn the compass on and off, see Heading Setup
 |
UPC - 753759031978
View all Garmin RINO 130 manuals
Add to My Manuals
Save this manual to your list of manuals |
Page 42 highlights
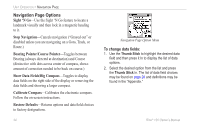
UNIT OPERATION > NAVIGATION PAGE To calibrate the Electronic Compass: 1. Use the Page button to access the Navigation Page. 2. Use the Thumb Stick to highlight the Option Menu on-screen button and press In. 3. Highlight the Calibrate Compass option and press the Thumb Stick In. 4. Press the Thumb Stick to activate the Start button and then follow on-screen directions for holding and turning the unit. Hold the unit level when calibrating the compass. Calibrating the compass: Hold the unit level and face up. Turn the unit around as shown above. The unit displays a "Just Right," "Too Fast," or "Too Slow" message for you to adjust your turning speed as needed. The "Calibration Successful" message displays when finished. If a "Calibration Failed" message displays, repeat the process. When you manually turn the Compass Off, it stays off until you manually turn it On again. Sometimes, however, when you turn the Compass On, the Rino 130 overrides the Compass and uses the GPS receiver to track your heading. The criteria for switching between the Compass and the GPS is customized on the Heading Setup Page (see section "Heading Setup Page"). To turn the compass on and off: • Press and hold the Zoom (Z) button. A message appears on the screen indicating that the compass has been turned on or off. • Press the Page button to access the Main Menu. Select Setup and then System. Turn the compass on and off through the System Setup Page (see section "System Setup Page"). 36 Rino® 130 Owner's Manual
-
 1
1 -
2
-
3
-
4
-
5
-
6
-
7
-
8
-
9
-
10
-
11
-
12
-
13
-
14
-
15
-
16
-
17
-
18
-
19
-
20
-
21
-
22
-
23
-
24
-
25
-
26
-
27
-
28
-
29
-
30
-
31
-
32
-
33
-
34
-
35
-
36
-
 37
37 -
 38
38 -
 39
39 -
 40
40 -
 41
41 -
 42
42 -
 43
43 -
 44
44 -
 45
45 -
 46
46 -
 47
47 -
48
-
49
-
50
-
51
-
52
-
53
-
54
-
55
-
56
-
57
-
58
-
59
-
60
-
61
-
62
-
63
-
64
-
65
-
66
-
67
-
68
-
69
-
70
-
71
-
72
-
73
-
74
-
75
-
76
-
77
-
78
-
79
-
80
-
81
-
82
-
83
-
84
-
85
-
86
-
87
-
88
-
89
-
90
-
91
-
92
-
93
-
94
-
95
-
96
-
97
-
98
-
99
-
100
-
101
-
102
-
103
-
104
-
105
-
106
-
107
-
108
-
109
-
110
-
111
-
112
-
113
-
114
-
115
-
116
-
117
-
118
-
119
-
120
-
121
-
122
-
123
-
124
-
125
-
126
-
127
-
128
-
129
-
130
-
131
-
132
 |
 |