Garmin RINO 130 Owner's Manual - Page 54
Creating Waypoints, To create a waypoint for a map feature, To create a waypoint using the panning
 |
UPC - 753759031978
View all Garmin RINO 130 manuals
Add to My Manuals
Save this manual to your list of manuals |
Page 54 highlights
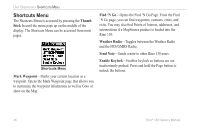
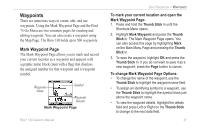
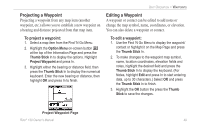
UNIT OPERATION > WAYPOINTS Creating Waypoints To create a waypoint for a map feature: 1. With the Pan Map feature active, move the panning arrow (map pointer) to the map item you want and highlight it. 2. Press In and release the Thumb Stick to display the item information page. 3. With the Information Page displayed, highlight the Option Menu button at the top of the page and then press the Thumb Stick to open the menu. 4. Highlight Save As Waypoint and press the Thumb Stick to save the item as a waypoint. Saving a map feature as a waypoint 48 To create a waypoint using the panning arrow: 1. With the Pan Map feature active, move the panning arrow (map pointer) on the map to the location you want to mark, then press the Thumb Stick. 2. The Mark Waypoint Page displays, automatically assigning a number to the waypoint. To create a waypoint by manually entering its coordinates (lat/lon): 1. Press In and hold the Thumb Stick to access the Shortcuts Menu. Highlight Mark Waypoint and press In. You can also use the Find 'N Go to view a previous waypoint. 2. Highlight the details field and press Left or Right on the Thumb Stick to change to the Location field. Press In and enter the new coordinates using the on-screen numerical keyboard. Highlight and press OK when finished. 3. You may also change the waypoint name and/or symbol or add notes. Rino® 130 Owner's Manual
-
 1
1 -
2
-
3
-
4
-
5
-
6
-
7
-
8
-
9
-
10
-
11
-
12
-
13
-
14
-
15
-
16
-
17
-
18
-
19
-
20
-
21
-
22
-
23
-
24
-
25
-
26
-
27
-
28
-
29
-
30
-
31
-
32
-
33
-
34
-
35
-
36
-
37
-
38
-
39
-
40
-
41
-
42
-
43
-
44
-
45
-
46
-
47
-
48
-
 49
49 -
 50
50 -
 51
51 -
 52
52 -
 53
53 -
 54
54 -
 55
55 -
 56
56 -
 57
57 -
 58
58 -
 59
59 -
60
-
61
-
62
-
63
-
64
-
65
-
66
-
67
-
68
-
69
-
70
-
71
-
72
-
73
-
74
-
75
-
76
-
77
-
78
-
79
-
80
-
81
-
82
-
83
-
84
-
85
-
86
-
87
-
88
-
89
-
90
-
91
-
92
-
93
-
94
-
95
-
96
-
97
-
98
-
99
-
100
-
101
-
102
-
103
-
104
-
105
-
106
-
107
-
108
-
109
-
110
-
111
-
112
-
113
-
114
-
115
-
116
-
117
-
118
-
119
-
120
-
121
-
122
-
123
-
124
-
125
-
126
-
127
-
128
-
129
-
130
-
131
-
132
 |
 |