Garmin Rino 520HCx Owner's Manual - Page 27
Map To send a location
 |
UPC - 753759066833
View all Garmin Rino 520HCx manuals
Add to My Manuals
Save this manual to your list of manuals |
Page 27 highlights
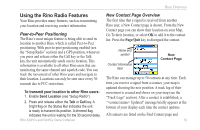
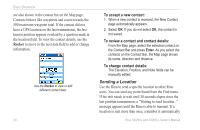
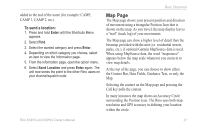
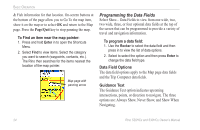
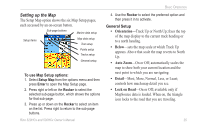
added to the end of the name (for example: CAMP, CAMP 1, CAMP 2, etc.). To send a location: 1. Press and hold Enter until the Shortcuts Menu appears. 2. Select Find. 3. Select the wanted category and press Enter. 4. Depending on which category you choose, select an item to view the Information page. 5. From the information page, open the option menu. 6. Select Send Location and press Enter again. The unit now sends the point to the other Rino users on your channel/squelch code. Basic Operation Map Page The Map page shows your present position and direction of movement using a triangular Position Icon that is shown on the map. As you travel, the map display leaves a "trail" (track log) of your movements. The Map page can show a higher level of detail than the basemap provided with the unit (i.e. residential streets, parks, etc.), if optional Garmin MapSource data is used. When using MapSource data, the word "mapsource" appears below the map scale whenever you zoom in to view map details. At the top of the page, you can choose to show either the Contact Bar, Data Fields, Guidance Text, or only the Map. Selecting the contact on the Map page and pressing the Call key polls the contact. In many instances the map shows an Accuracy Circle surrounding the Position Icon. The Rino uses both map resolution and GPS accuracy in defining your location within the circle. Rino 520HCx and 530HCx Owner's Manual 21
-
 1
1 -
2
-
3
-
4
-
5
-
6
-
7
-
8
-
9
-
10
-
11
-
12
-
13
-
14
-
15
-
16
-
17
-
18
-
19
-
20
-
21
-
 22
22 -
 23
23 -
 24
24 -
 25
25 -
 26
26 -
 27
27 -
 28
28 -
 29
29 -
 30
30 -
 31
31 -
 32
32 -
33
-
34
-
35
-
36
-
37
-
38
-
39
-
40
-
41
-
42
-
43
-
44
-
45
-
46
-
47
-
48
-
49
-
50
-
51
-
52
-
53
-
54
-
55
-
56
-
57
-
58
-
59
-
60
-
61
-
62
-
63
-
64
-
65
-
66
-
67
-
68
-
69
-
70
-
71
-
72
-
73
-
74
 |
 |