HP 2500 HP Color LaserJet 2500 series - User Guide - Page 140
Enabling memory, Enabling the language font DIMM, To enable memory for Windows
 |
View all HP 2500 manuals
Add to My Manuals
Save this manual to your list of manuals |
Page 140 highlights
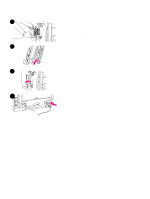
Enabling memory If the printer has a new memory DIMM installed, all Windows users of the printer must set the printer driver to recognize the newly added memory. Macintosh computers automatically recognize new memory. To enable memory for Windows 1 On the Start menu, point to Settings, and click Printers or Printers and Faxes. 2 Select this printer and select Properties. 3 On the Configure tab, click More. 4 In the Total Memory field, enter the total amount of memory that is now installed. 5 Click OK. To enable memory for Mac OS Note Enabling memory for OS X might be different than how it is stated here. 1 Click the desktop printer icon. 2 From the Printing menu, select Change Setup. Enabling the language font DIMM If the printer has a new language font DIMM installed, all Windows users of the printer must set the printer driver to recognize the newly installed font DIMM. Macintosh computers automatically recognize new language font DIMMs. To enable fonts for Windows 1 On the Start menu, point to Settings, and click Printers. 2 Select this printer and select Properties. 3 On the Configure tab, click More. 4 Select the Font DIMM check box. 5 Click OK. 138 Working with memory and print server cards ENWW
-
 1
1 -
2
-
3
-
4
-
5
-
6
-
7
-
8
-
9
-
10
-
11
-
12
-
13
-
14
-
15
-
16
-
17
-
18
-
19
-
20
-
21
-
22
-
23
-
24
-
25
-
26
-
27
-
28
-
29
-
30
-
31
-
32
-
33
-
34
-
35
-
36
-
37
-
38
-
39
-
40
-
41
-
42
-
43
-
44
-
45
-
46
-
47
-
48
-
49
-
50
-
51
-
52
-
53
-
54
-
55
-
56
-
57
-
58
-
59
-
60
-
61
-
62
-
63
-
64
-
65
-
66
-
67
-
68
-
69
-
70
-
71
-
72
-
73
-
74
-
75
-
76
-
77
-
78
-
79
-
80
-
81
-
82
-
83
-
84
-
85
-
86
-
87
-
88
-
89
-
90
-
91
-
92
-
93
-
94
-
95
-
96
-
97
-
98
-
99
-
100
-
101
-
102
-
103
-
104
-
105
-
106
-
107
-
108
-
109
-
110
-
111
-
112
-
113
-
114
-
115
-
116
-
117
-
118
-
119
-
120
-
121
-
122
-
123
-
124
-
125
-
126
-
127
-
128
-
129
-
130
-
131
-
132
-
133
-
134
-
 135
135 -
 136
136 -
 137
137 -
 138
138 -
 139
139 -
 140
140 -
 141
141 -
 142
142 -
 143
143 -
 144
144 -
 145
145 -
146
-
147
-
148
-
149
-
150
-
151
-
152
 |
 |
