HP 882c (English) Windows Connect * User's Guide - C6413-90009 - Page 56
Printing on Transparencies, HP Premium Inkjet Transparency Film
 |
View all HP 882c manuals
Add to My Manuals
Save this manual to your list of manuals |
Page 56 highlights
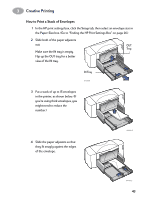
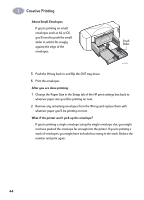
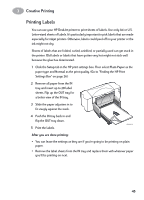
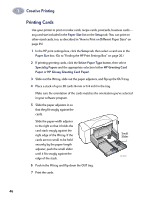
3 Creative Printing Printing on Transparencies For best results when printing your overhead presentation, use HP Premium Inkjet Rapid-Dry Transparencies. The film coating on HP Premium Inkjet Rapid-Dry Transparencies has been especially developed to work with HP inks, giving you crisp images and text, and the fastest drying times. They won't jam your printer, either. Look for them at large office supply stores. 1 In the HP print settings box, click the Setup tab. Click the Select Paper Type button, then select Transparency Films and the appropriate selection (either HP Premium Inkjet Transparency Film, HP Premium Inkjet Rapid-Dry Transparencies, or Other Transparency Films). Click Best as the print quality. (Go to "Finding the HP Print Settings Box" on page 26.) Transparencies need longer drying times than regular paper. The printer dries them automatically before it releases them. Press the Resume button on the front of your printer to continue printing. It isn't absolutely necessary to use the Best print quality, but it gives the best results. You can get terrific results, with faster printing, by using the Normal print quality. 2 If you plan to make notes on your transparencies during your presentation, in the HP print settings box, click the Features tab. Select Flip Horizontal. 3 Flip up the OUT tray for a better view of the IN tray. 4 Put the transparencies in your printer with the rough side down and the adhesive strip toward the printer. (You can peel off the adhesive strip after printing.) 5 Slide in the paper adjusters, just as you would for plain paper. Push the IN tray back in and flip the OUT tray down. 6 Print the transparency. Adhesive Strip 6410038 48
-
 1
1 -
2
-
3
-
4
-
5
-
6
-
7
-
8
-
9
-
10
-
11
-
12
-
13
-
14
-
15
-
16
-
17
-
18
-
19
-
20
-
21
-
22
-
23
-
24
-
25
-
26
-
27
-
28
-
29
-
30
-
31
-
32
-
33
-
34
-
35
-
36
-
37
-
38
-
39
-
40
-
41
-
42
-
43
-
44
-
45
-
46
-
47
-
48
-
49
-
50
-
 51
51 -
 52
52 -
 53
53 -
 54
54 -
 55
55 -
 56
56 -
 57
57 -
 58
58 -
 59
59 -
 60
60 -
 61
61 -
62
-
63
-
64
-
65
-
66
-
67
-
68
-
69
-
70
-
71
-
72
-
73
-
74
-
75
-
76
-
77
-
78
-
79
-
80
-
81
-
82
-
83
-
84
-
85
-
86
-
87
-
88
-
89
-
90
-
91
-
92
-
93
-
94
-
95
-
96
-
97
-
98
-
99
-
100
-
101
-
102
-
103
-
104
-
105
-
106
-
107
-
108
-
109
-
110
-
111
-
112
-
113
-
114
-
115
-
116
-
117
-
118
 |
 |
