HP Deskjet Ink Advantage F700 User Guide - Page 108
Printouts have horizontal streaks or lines, Cause, Solution, Advanced, Enabled, Maximum dpi
 |
View all HP Deskjet Ink Advantage F700 manuals
Add to My Manuals
Save this manual to your list of manuals |
Page 108 highlights
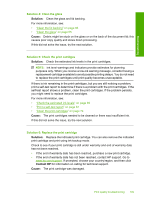
Troubleshooting NOTE: There is no problem with the ink supplies and replacing the print cartridges is unnecessary. For more information, see: • "Recommended papers for printing and copying" on page 22 • "Information on paper" on page 93 Cause: The wrong kind of paper was loaded in the input tray. If this did not solve the issue, try the next solution. Solution 2: Check the print quality setting Solution: Check the quality setting. Use a higher quality setting to increase the amount of ink used for printing. NOTE: For maximum dpi resolution, go to the Advanced tab, and then select Enabled from the Maximum dpi drop-down list. For more information, see "Print using Maximum dpi" on page 41. For more information, see: • "Change the print speed or quality" on page 34 • "Print using Maximum dpi" on page 41 • "Make a Fast copy" on page 56 Cause: The print quality setting was set too low. If this did not solve the issue, try the next solution. Solution 3: Rotate the image Solution: If the problem persists, use the software you installed with the product or another software application to rotate your image 180 degrees so that the light blue, gray, or brown hues in your image do not print at the bottom of the page. For more information, see: "Change the page orientation" on page 34 Cause: The photo image had light blue, gray, or brown hues that print near the bottom of the page. Printouts have horizontal streaks or lines Try the following solutions if your printout has lines, streaks, or marks on it that run sideto-side across the width of the page. • Solution 1: Make sure the paper is loaded correctly • Solution 2: Check the print quality setting • Solution 3: If the print cartridge was dropped, wait for it to recover • Solution 4: Clean the print cartridge nozzles Print quality troubleshooting 105
-
 1
1 -
2
-
3
-
4
-
5
-
6
-
7
-
8
-
9
-
10
-
11
-
12
-
13
-
14
-
15
-
16
-
17
-
18
-
19
-
20
-
21
-
22
-
23
-
24
-
25
-
26
-
27
-
28
-
29
-
30
-
31
-
32
-
33
-
34
-
35
-
36
-
37
-
38
-
39
-
40
-
41
-
42
-
43
-
44
-
45
-
46
-
47
-
48
-
49
-
50
-
51
-
52
-
53
-
54
-
55
-
56
-
57
-
58
-
59
-
60
-
61
-
62
-
63
-
64
-
65
-
66
-
67
-
68
-
69
-
70
-
71
-
72
-
73
-
74
-
75
-
76
-
77
-
78
-
79
-
80
-
81
-
82
-
83
-
84
-
85
-
86
-
87
-
88
-
89
-
90
-
91
-
92
-
93
-
94
-
95
-
96
-
97
-
98
-
99
-
100
-
101
-
102
-
 103
103 -
 104
104 -
 105
105 -
 106
106 -
 107
107 -
 108
108 -
 109
109 -
 110
110 -
 111
111 -
 112
112 -
 113
113 -
114
-
115
-
116
-
117
-
118
-
119
-
120
-
121
-
122
-
123
-
124
-
125
-
126
-
127
-
128
-
129
-
130
-
131
-
132
-
133
-
134
-
135
-
136
-
137
-
138
-
139
-
140
-
141
-
142
-
143
-
144
-
145
-
146
-
147
-
148
-
149
-
150
-
151
-
152
-
153
-
154
-
155
-
156
-
157
-
158
-
159
-
160
-
161
-
162
-
163
-
164
-
165
-
166
-
167
-
168
-
169
-
170
-
171
-
172
-
173
-
174
-
175
-
176
-
177
-
178
-
179
-
180
-
181
-
182
-
183
-
184
-
185
-
186
-
187
-
188
-
189
-
190
-
191
-
192
-
193
-
194
-
195
-
196
-
197
-
198
-
199
-
200
-
201
-
202
-
203
-
204
-
205
-
206
-
207
-
208
-
209
-
210
-
211
-
212
-
213
-
214
-
215
-
216
-
217
-
218
-
219
-
220
-
221
-
222
-
223
-
224
-
225
-
226
-
227
-
228
-
229
-
230
-
231
 |
 |