HP Deskjet Ink Advantage F700 User Guide - Page 79
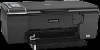
Hold the print cartridge by its sides., excess water from it.
 |
View all HP Deskjet Ink Advantage F700 manuals
Add to My Manuals
Save this manual to your list of manuals |
Page 79 highlights
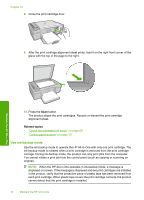
Chapter 10 2. Wait until the print carriage is idle and silent, and then unplug the power cord from the back of the product. 3. Lightly press down on the print cartridge to release it, and then pull it towards you out of the slot. NOTE: Do not remove both print cartridges at the same time. Remove and clean each print cartridge one at a time. Do not leave a print cartridge outside the HP Allin-One for more than 30 minutes. 4. Inspect the print cartridge contacts for ink and debris buildup. 5. Dip a clean foam rubber swab or lint-free cloth into distilled water, and squeeze any excess water from it. 6. Hold the print cartridge by its sides. 7. Clean only the copper-colored contacts. Allow the print cartridges to dry for approximately ten minutes. 1 Copper-colored contacts 2 Ink nozzles (do not clean) 8. Hold the print cartridge with the HP logo on top, and insert the print cartridge back into the slot. Make sure you push the print cartridge in firmly until it snaps into place. Maintain the HP All-in-One 76 Maintain the HP All-in-One
-
 1
1 -
2
-
3
-
4
-
5
-
6
-
7
-
8
-
9
-
10
-
11
-
12
-
13
-
14
-
15
-
16
-
17
-
18
-
19
-
20
-
21
-
22
-
23
-
24
-
25
-
26
-
27
-
28
-
29
-
30
-
31
-
32
-
33
-
34
-
35
-
36
-
37
-
38
-
39
-
40
-
41
-
42
-
43
-
44
-
45
-
46
-
47
-
48
-
49
-
50
-
51
-
52
-
53
-
54
-
55
-
56
-
57
-
58
-
59
-
60
-
61
-
62
-
63
-
64
-
65
-
66
-
67
-
68
-
69
-
70
-
71
-
72
-
73
-
 74
74 -
 75
75 -
 76
76 -
 77
77 -
 78
78 -
 79
79 -
 80
80 -
 81
81 -
 82
82 -
 83
83 -
 84
84 -
85
-
86
-
87
-
88
-
89
-
90
-
91
-
92
-
93
-
94
-
95
-
96
-
97
-
98
-
99
-
100
-
101
-
102
-
103
-
104
-
105
-
106
-
107
-
108
-
109
-
110
-
111
-
112
-
113
-
114
-
115
-
116
-
117
-
118
-
119
-
120
-
121
-
122
-
123
-
124
-
125
-
126
-
127
-
128
-
129
-
130
-
131
-
132
-
133
-
134
-
135
-
136
-
137
-
138
-
139
-
140
-
141
-
142
-
143
-
144
-
145
-
146
-
147
-
148
-
149
-
150
-
151
-
152
-
153
-
154
-
155
-
156
-
157
-
158
-
159
-
160
-
161
-
162
-
163
-
164
-
165
-
166
-
167
-
168
-
169
-
170
-
171
-
172
-
173
-
174
-
175
-
176
-
177
-
178
-
179
-
180
-
181
-
182
-
183
-
184
-
185
-
186
-
187
-
188
-
189
-
190
-
191
-
192
-
193
-
194
-
195
-
196
-
197
-
198
-
199
-
200
-
201
-
202
-
203
-
204
-
205
-
206
-
207
-
208
-
209
-
210
-
211
-
212
-
213
-
214
-
215
-
216
-
217
-
218
-
219
-
220
-
221
-
222
-
223
-
224
-
225
-
226
-
227
-
228
-
229
-
230
-
231
 |
 |