HP Deskjet Ink Advantage F700 User Guide - Page 149
Finish, Cause, Solution, Digital Imaging Monitor, To check that the Digital Imaging Monitor is running
 |
View all HP Deskjet Ink Advantage F700 manuals
Add to My Manuals
Save this manual to your list of manuals |
Page 149 highlights
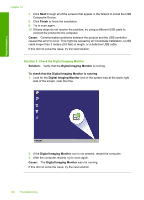
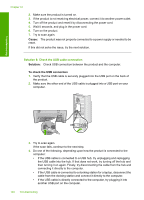
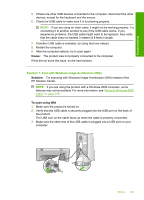
Troubleshooting Chapter 12 7. Click Next through all of the screens that appear in the Wizard to install the USB Composite Device. 8. Click Finish to finish the installation. 9. Try to scan again. 10. If these steps do not resolve the problem, try using a different USB cable to connect the product to the computer. Cause: Communication problems between the product and the USB controller caused this error to occur. This might be caused by an incomplete installation, a USB cable longer than 3 meters (9.8 feet) in length, or a defective USB cable. If this did not solve the issue, try the next solution. Solution 3: Check the Digital Imaging Monitor Solution: Verify that the Digital Imaging Monitor is running. To check that the Digital Imaging Monitor is running 1. Look for the Digital Imaging Monitor icon in the system tray at the lower right side of the screen, near the time. 2. If the Digital Imaging Monitor icon is not present, restart the computer. 3. After the computer restarts, try to scan again. Cause: The Digital Imaging Monitor was not running. If this did not solve the issue, try the next solution. 146 Troubleshooting
-
 1
1 -
2
-
3
-
4
-
5
-
6
-
7
-
8
-
9
-
10
-
11
-
12
-
13
-
14
-
15
-
16
-
17
-
18
-
19
-
20
-
21
-
22
-
23
-
24
-
25
-
26
-
27
-
28
-
29
-
30
-
31
-
32
-
33
-
34
-
35
-
36
-
37
-
38
-
39
-
40
-
41
-
42
-
43
-
44
-
45
-
46
-
47
-
48
-
49
-
50
-
51
-
52
-
53
-
54
-
55
-
56
-
57
-
58
-
59
-
60
-
61
-
62
-
63
-
64
-
65
-
66
-
67
-
68
-
69
-
70
-
71
-
72
-
73
-
74
-
75
-
76
-
77
-
78
-
79
-
80
-
81
-
82
-
83
-
84
-
85
-
86
-
87
-
88
-
89
-
90
-
91
-
92
-
93
-
94
-
95
-
96
-
97
-
98
-
99
-
100
-
101
-
102
-
103
-
104
-
105
-
106
-
107
-
108
-
109
-
110
-
111
-
112
-
113
-
114
-
115
-
116
-
117
-
118
-
119
-
120
-
121
-
122
-
123
-
124
-
125
-
126
-
127
-
128
-
129
-
130
-
131
-
132
-
133
-
134
-
135
-
136
-
137
-
138
-
139
-
140
-
141
-
142
-
143
-
 144
144 -
 145
145 -
 146
146 -
 147
147 -
 148
148 -
 149
149 -
 150
150 -
 151
151 -
 152
152 -
 153
153 -
 154
154 -
155
-
156
-
157
-
158
-
159
-
160
-
161
-
162
-
163
-
164
-
165
-
166
-
167
-
168
-
169
-
170
-
171
-
172
-
173
-
174
-
175
-
176
-
177
-
178
-
179
-
180
-
181
-
182
-
183
-
184
-
185
-
186
-
187
-
188
-
189
-
190
-
191
-
192
-
193
-
194
-
195
-
196
-
197
-
198
-
199
-
200
-
201
-
202
-
203
-
204
-
205
-
206
-
207
-
208
-
209
-
210
-
211
-
212
-
213
-
214
-
215
-
216
-
217
-
218
-
219
-
220
-
221
-
222
-
223
-
224
-
225
-
226
-
227
-
228
-
229
-
230
-
231
 |
 |