HP Deskjet Ink Advantage F700 User Guide - Page 95
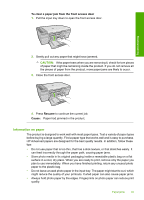
Clear paper jams, CAUTION, Solution, To clear a paper jam from the rear access door, Resume
 |
View all HP Deskjet Ink Advantage F700 manuals
Add to My Manuals
Save this manual to your list of manuals |
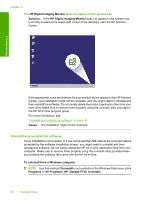
Page 95 highlights
Troubleshooting Chapter 12 • Ensure that paper loaded in the input tray lays flat and the edges are not bent or torn. • Do not combine different paper types and paper sizes in the input tray; the entire stack of paper in the input tray must be the same size and type. • Adjust the paper-width guide in the input tray to fit snugly against all paper. Make sure the paper-width guide does not bend the paper in the input tray. • Do not force paper too far forward in the input tray. • Use paper types that are recommended for the product. For more information, see the following topics: • Clear paper jams • Information on paper Clear paper jams Solution: In case of a paper jam, first check the rear access door. If the jammed paper is not in the rear rollers, check the front access door. Occasionally small media jams may not be reachable from the rear access door. Use the front access door if unable to clear the jam from the rear access door. To clear a paper jam from the rear access door 1. Press in the tab on the left side of the rear access door to release the door. Remove the door by pulling it away from the product. 2. Gently pull the paper out of the rollers. CAUTION: If the paper tears when you are removing it from the rollers, check the rollers and wheels for torn pieces of paper that might be remaining inside the product. If you do not remove all the pieces of paper from the product, more paper jams are likely to occur. 3. Replace the rear access door. Gently push the door forward until it snaps into place. 4. Press Resume to continue the current job. 92 Troubleshooting
-
 1
1 -
2
-
3
-
4
-
5
-
6
-
7
-
8
-
9
-
10
-
11
-
12
-
13
-
14
-
15
-
16
-
17
-
18
-
19
-
20
-
21
-
22
-
23
-
24
-
25
-
26
-
27
-
28
-
29
-
30
-
31
-
32
-
33
-
34
-
35
-
36
-
37
-
38
-
39
-
40
-
41
-
42
-
43
-
44
-
45
-
46
-
47
-
48
-
49
-
50
-
51
-
52
-
53
-
54
-
55
-
56
-
57
-
58
-
59
-
60
-
61
-
62
-
63
-
64
-
65
-
66
-
67
-
68
-
69
-
70
-
71
-
72
-
73
-
74
-
75
-
76
-
77
-
78
-
79
-
80
-
81
-
82
-
83
-
84
-
85
-
86
-
87
-
88
-
89
-
 90
90 -
 91
91 -
 92
92 -
 93
93 -
 94
94 -
 95
95 -
 96
96 -
 97
97 -
 98
98 -
 99
99 -
 100
100 -
101
-
102
-
103
-
104
-
105
-
106
-
107
-
108
-
109
-
110
-
111
-
112
-
113
-
114
-
115
-
116
-
117
-
118
-
119
-
120
-
121
-
122
-
123
-
124
-
125
-
126
-
127
-
128
-
129
-
130
-
131
-
132
-
133
-
134
-
135
-
136
-
137
-
138
-
139
-
140
-
141
-
142
-
143
-
144
-
145
-
146
-
147
-
148
-
149
-
150
-
151
-
152
-
153
-
154
-
155
-
156
-
157
-
158
-
159
-
160
-
161
-
162
-
163
-
164
-
165
-
166
-
167
-
168
-
169
-
170
-
171
-
172
-
173
-
174
-
175
-
176
-
177
-
178
-
179
-
180
-
181
-
182
-
183
-
184
-
185
-
186
-
187
-
188
-
189
-
190
-
191
-
192
-
193
-
194
-
195
-
196
-
197
-
198
-
199
-
200
-
201
-
202
-
203
-
204
-
205
-
206
-
207
-
208
-
209
-
210
-
211
-
212
-
213
-
214
-
215
-
216
-
217
-
218
-
219
-
220
-
221
-
222
-
223
-
224
-
225
-
226
-
227
-
228
-
229
-
230
-
231
 |
 |
