HP J7934A HP Jetdirect Administrator's Guide - Page 66
Windows 2000 Server/Server 2003, Add New Scope
 |
UPC - 829160279466
View all HP J7934A manuals
Add to My Manuals
Save this manual to your list of manuals |
Page 66 highlights
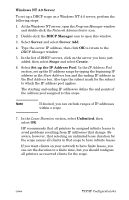
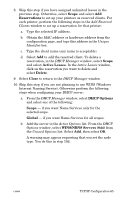
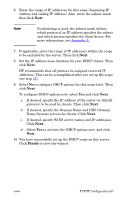
c. You must now provide the IP address of the WINS server by doing the following: ● Select Value, then Edit Array. ● From the IP Address Array Editor, select Remove to delete any undesired addresses previously set. Then type in the IP address of the WINS server and select Add. ● Once the address appears in the list of IP addresses, select OK. This returns you to the DHCP Options window. If the address you have just added appears in the list of IP addresses (near the bottom of the window) return to step 10d. Otherwise, repeat step 10c. d. In the DHCP Options window, select WINS/NBT Node Type (046) from the Unused Options list. Select Add to add the node type to the Active Options list. In the Byte box, type 0x4 to indicate a mixed node, and select OK. 11. Click Close to exit to Program Manager. Windows 2000 Server/Server 2003 To set up a DHCP scope on a Windows 2000 server or Server 2003 system, perform the following steps: 1. Run the Windows DHCP manager utility. ■ Windows 2000: Click Start, then select Settings and Control Panel. Open the Administrative Tools folder and run the DHCP utility. ■ Server 2003: Click Start, then select Control Panel. Open the Administrative Tools folder and run the DHCP utility. 2. In the DHCP window, locate and select your Windows server in the DHCP tree. If your server is not listed in the tree, select DHCP and click the Action menu to add the server. 3. After selecting your server in the DHCP tree, click the Action menu and select New Scope. This runs the Add New Scope Wizard. 4. In the Add New Scope Wizard, click Next. 5. Enter a Name and Description for this scope, then click Next. ENWW TCP/IP Configuration 66
-
 1
1 -
2
-
3
-
4
-
5
-
6
-
7
-
8
-
9
-
10
-
11
-
12
-
13
-
14
-
15
-
16
-
17
-
18
-
19
-
20
-
21
-
22
-
23
-
24
-
25
-
26
-
27
-
28
-
29
-
30
-
31
-
32
-
33
-
34
-
35
-
36
-
37
-
38
-
39
-
40
-
41
-
42
-
43
-
44
-
45
-
46
-
47
-
48
-
49
-
50
-
51
-
52
-
53
-
54
-
55
-
56
-
57
-
58
-
59
-
60
-
 61
61 -
 62
62 -
 63
63 -
 64
64 -
 65
65 -
 66
66 -
 67
67 -
 68
68 -
 69
69 -
 70
70 -
 71
71 -
72
-
73
-
74
-
75
-
76
-
77
-
78
-
79
-
80
-
81
-
82
-
83
-
84
-
85
-
86
-
87
-
88
-
89
-
90
-
91
-
92
-
93
-
94
-
95
-
96
-
97
-
98
-
99
-
100
-
101
-
102
-
103
-
104
-
105
-
106
-
107
-
108
-
109
-
110
-
111
-
112
-
113
-
114
-
115
-
116
-
117
-
118
-
119
-
120
-
121
-
122
-
123
-
124
-
125
-
126
-
127
-
128
-
129
-
130
-
131
-
132
-
133
-
134
-
135
-
136
-
137
-
138
-
139
-
140
-
141
-
142
-
143
-
144
-
145
-
146
-
147
-
148
-
149
-
150
-
151
-
152
-
153
-
154
-
155
-
156
-
157
-
158
-
159
-
160
-
161
-
162
-
163
-
164
-
165
-
166
-
167
-
168
-
169
-
170
-
171
-
172
-
173
-
174
-
175
-
176
-
177
-
178
-
179
-
180
-
181
-
182
-
183
-
184
-
185
-
186
-
187
-
188
-
189
-
190
-
191
-
192
-
193
-
194
-
195
-
196
-
197
-
198
-
199
-
200
-
201
-
202
-
203
-
204
-
205
-
206
-
207
-
208
-
209
-
210
-
211
-
212
-
213
-
214
-
215
-
216
-
217
-
218
-
219
-
220
-
221
-
222
-
223
-
224
-
225
-
226
-
227
-
228
-
229
-
230
-
231
-
232
-
233
-
234
-
235
-
236
-
237
-
238
-
239
-
240
-
241
-
242
-
243
-
244
-
245
-
246
-
247
-
248
-
249
-
250
-
251
-
252
-
253
-
254
-
255
-
256
-
257
-
258
-
259
-
260
-
261
-
262
-
263
-
264
 |
 |