HP Photosmart C4400 Full User Guide - Page 140
The image is cropped when I make a borderless copy, Solution, Cause, Resize to Fit, Resize, to Fit
 |
View all HP Photosmart C4400 manuals
Add to My Manuals
Save this manual to your list of manuals |
Page 140 highlights
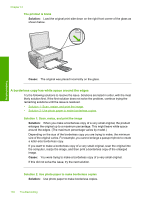
Troubleshooting Solution 3: Wipe the glass and the back of the document lid Solution: Turn off the product, unplug the power cord, and then use a soft cloth to wipe the glass and the back of the document lid. For more information, see: • "Clean the glass" on page 67 • "Clean the lid backing" on page 68 Cause: Debris might have been stuck on the glass or on the back of the document lid. The product interprets anything it detects on the glass as part of the image. The image is cropped when I make a borderless copy Try the following solutions to resolve the issue. Solutions are listed in order, with the most likely solution first. If the first solution does not solve the problem, continue trying the remaining solutions until the issue is resolved. • Solution 1: Use Resize to Fit to enlarge the photo • Solution 2: Use Resize to Fit to reduce the original to fit on the paper Solution 1: Use Resize to Fit to enlarge the photo Solution: If you want to enlarge a photo to fit a full-size page without cropping the edges, use Resize to Fit. For more information, see: "Resize an original to fit onto letter or A4 paper" on page 60 Cause: The product cropped some of the image around the margins of the copy to achieve a borderless print without changing the proportions of the original. If this did not solve the issue, try the next solution. Solution 2: Use Resize to Fit to reduce the original to fit on the paper Solution: If your original is larger than the paper in the input tray, use the Resize to Fit feature to reduce your original to fit on the paper in the input tray. For more information, see: "Resize an original to fit onto letter or A4 paper" on page 60 Cause: The original was larger than the paper in the input tray. Copy troubleshooting 137
-
 1
1 -
2
-
3
-
4
-
5
-
6
-
7
-
8
-
9
-
10
-
11
-
12
-
13
-
14
-
15
-
16
-
17
-
18
-
19
-
20
-
21
-
22
-
23
-
24
-
25
-
26
-
27
-
28
-
29
-
30
-
31
-
32
-
33
-
34
-
35
-
36
-
37
-
38
-
39
-
40
-
41
-
42
-
43
-
44
-
45
-
46
-
47
-
48
-
49
-
50
-
51
-
52
-
53
-
54
-
55
-
56
-
57
-
58
-
59
-
60
-
61
-
62
-
63
-
64
-
65
-
66
-
67
-
68
-
69
-
70
-
71
-
72
-
73
-
74
-
75
-
76
-
77
-
78
-
79
-
80
-
81
-
82
-
83
-
84
-
85
-
86
-
87
-
88
-
89
-
90
-
91
-
92
-
93
-
94
-
95
-
96
-
97
-
98
-
99
-
100
-
101
-
102
-
103
-
104
-
105
-
106
-
107
-
108
-
109
-
110
-
111
-
112
-
113
-
114
-
115
-
116
-
117
-
118
-
119
-
120
-
121
-
122
-
123
-
124
-
125
-
126
-
127
-
128
-
129
-
130
-
131
-
132
-
133
-
134
-
 135
135 -
 136
136 -
 137
137 -
 138
138 -
 139
139 -
 140
140 -
 141
141 -
 142
142 -
 143
143 -
 144
144 -
 145
145 -
146
-
147
-
148
-
149
-
150
-
151
-
152
-
153
-
154
-
155
-
156
-
157
-
158
-
159
-
160
-
161
-
162
-
163
-
164
-
165
-
166
-
167
-
168
-
169
-
170
-
171
-
172
-
173
-
174
-
175
-
176
-
177
-
178
-
179
-
180
-
181
-
182
-
183
-
184
-
185
-
186
-
187
-
188
-
189
-
190
-
191
-
192
-
193
-
194
-
195
-
196
-
197
-
198
-
199
-
200
-
201
-
202
-
203
-
204
-
205
-
206
-
207
-
208
-
209
-
210
-
211
-
212
-
213
-
214
-
215
-
216
-
217
-
218
-
219
-
220
-
221
-
222
-
223
-
224
-
225
-
226
-
227
-
228
-
229
-
230
-
231
-
232
-
233
-
234
-
235
-
236
-
237
-
238
-
239
-
240
-
241
-
242
-
243
 |
 |