HP Photosmart C4400 Full User Guide - Page 212
Solution 3: Remove and reinsert the print cartridges, Solution 4: Contact HP support
 |
View all HP Photosmart C4400 manuals
Add to My Manuals
Save this manual to your list of manuals |
Page 212 highlights
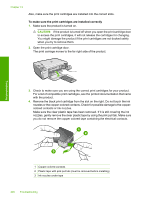
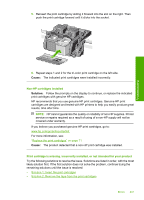
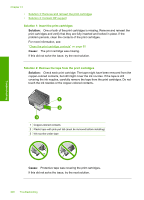
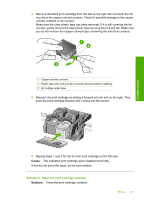
Troubleshooting Solution 3: Remove and reinsert the print cartridges Solution: One or both of the print cartridges are not installed or are installed incorrectly. Remove and reinsert the print cartridges and verify that they are fully inserted and locked in place. If the problem persists, clean the copper-colored contacts of the print cartridges. For more information, see: "Clean the print cartridges" on page 79 Cause: One or both of the print cartridges were not installed or were installed incorrectly. If this did not solve the issue, try the next solution. Solution 4: Contact HP support Solution: Contact HP support for service. Go to: www.hp.com/support. If prompted, choose your country/region, and then click Contact HP for information on calling for technical support. Cause: The print cartridge was defective or not intended for use in this product. Printing in ink-backup mode Solution: If you receive the ink-backup mode message and two print cartridges are installed in the product, verify that the protective piece of plastic tape has been removed from each print cartridge. When plastic tape covers the print cartridge contacts, the product cannot detect that the print cartridge is installed. 1 Copper-colored contacts 2 Plastic tape with pink pull tab (must be removed before installing) 3 Ink nozzles under tape Cause: When the product detected that only one print cartridge is installed, inkbackup mode is initiated. This printing mode lets you print with a single print cartridge, but it slows the product and affects the quality of printouts. Errors 209
-
 1
1 -
2
-
3
-
4
-
5
-
6
-
7
-
8
-
9
-
10
-
11
-
12
-
13
-
14
-
15
-
16
-
17
-
18
-
19
-
20
-
21
-
22
-
23
-
24
-
25
-
26
-
27
-
28
-
29
-
30
-
31
-
32
-
33
-
34
-
35
-
36
-
37
-
38
-
39
-
40
-
41
-
42
-
43
-
44
-
45
-
46
-
47
-
48
-
49
-
50
-
51
-
52
-
53
-
54
-
55
-
56
-
57
-
58
-
59
-
60
-
61
-
62
-
63
-
64
-
65
-
66
-
67
-
68
-
69
-
70
-
71
-
72
-
73
-
74
-
75
-
76
-
77
-
78
-
79
-
80
-
81
-
82
-
83
-
84
-
85
-
86
-
87
-
88
-
89
-
90
-
91
-
92
-
93
-
94
-
95
-
96
-
97
-
98
-
99
-
100
-
101
-
102
-
103
-
104
-
105
-
106
-
107
-
108
-
109
-
110
-
111
-
112
-
113
-
114
-
115
-
116
-
117
-
118
-
119
-
120
-
121
-
122
-
123
-
124
-
125
-
126
-
127
-
128
-
129
-
130
-
131
-
132
-
133
-
134
-
135
-
136
-
137
-
138
-
139
-
140
-
141
-
142
-
143
-
144
-
145
-
146
-
147
-
148
-
149
-
150
-
151
-
152
-
153
-
154
-
155
-
156
-
157
-
158
-
159
-
160
-
161
-
162
-
163
-
164
-
165
-
166
-
167
-
168
-
169
-
170
-
171
-
172
-
173
-
174
-
175
-
176
-
177
-
178
-
179
-
180
-
181
-
182
-
183
-
184
-
185
-
186
-
187
-
188
-
189
-
190
-
191
-
192
-
193
-
194
-
195
-
196
-
197
-
198
-
199
-
200
-
201
-
202
-
203
-
204
-
205
-
206
-
 207
207 -
 208
208 -
 209
209 -
 210
210 -
 211
211 -
 212
212 -
 213
213 -
 214
214 -
 215
215 -
 216
216 -
 217
217 -
218
-
219
-
220
-
221
-
222
-
223
-
224
-
225
-
226
-
227
-
228
-
229
-
230
-
231
-
232
-
233
-
234
-
235
-
236
-
237
-
238
-
239
-
240
-
241
-
242
-
243
 |
 |