HP Photosmart C4600 User Guide - Page 103
Solution 1: Insert the print cartridges, Solution, To clean the print cartridge contacts
 |
View all HP Photosmart C4600 manuals
Add to My Manuals
Save this manual to your list of manuals |
Page 103 highlights
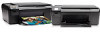
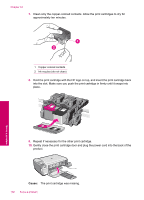
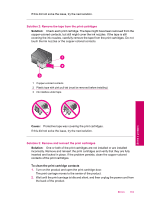
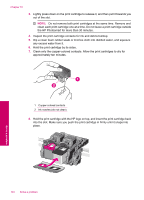
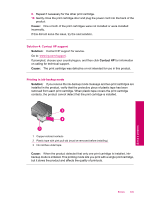
• Solution 3: Remove and reinsert the print cartridges • Solution 4: Contact HP support Solution 1: Insert the print cartridges Solution: One or both of the print cartridges is missing. Remove and reinsert the print cartridges and verify that they are fully inserted and locked in place. If the problem persists, clean the contacts of the print cartridges. To clean the print cartridge contacts 1. Turn on the product and open the print cartridge door. The print carriage moves to the far right side of the product. 2. Wait until the print carriage is idle and silent, and then unplug the power cord from the back of the product. 3. Lightly press down on the print cartridge to release it, and then pull it towards you out of the slot. NOTE: Do not remove both print cartridges at the same time. Remove and clean each print cartridge one at a time. Do not leave a print cartridge outside the HP Photosmart for more than 30 minutes. 4. Inspect the print cartridge contacts for ink and debris buildup. 5. Dip a clean foam rubber swab or lint-free cloth into distilled water, and squeeze any excess water from it. 6. Hold the print cartridge by its sides. Errors 101 Solve a problem
-
 1
1 -
2
-
3
-
4
-
5
-
6
-
7
-
8
-
9
-
10
-
11
-
12
-
13
-
14
-
15
-
16
-
17
-
18
-
19
-
20
-
21
-
22
-
23
-
24
-
25
-
26
-
27
-
28
-
29
-
30
-
31
-
32
-
33
-
34
-
35
-
36
-
37
-
38
-
39
-
40
-
41
-
42
-
43
-
44
-
45
-
46
-
47
-
48
-
49
-
50
-
51
-
52
-
53
-
54
-
55
-
56
-
57
-
58
-
59
-
60
-
61
-
62
-
63
-
64
-
65
-
66
-
67
-
68
-
69
-
70
-
71
-
72
-
73
-
74
-
75
-
76
-
77
-
78
-
79
-
80
-
81
-
82
-
83
-
84
-
85
-
86
-
87
-
88
-
89
-
90
-
91
-
92
-
93
-
94
-
95
-
96
-
97
-
 98
98 -
 99
99 -
 100
100 -
 101
101 -
 102
102 -
 103
103 -
 104
104 -
 105
105 -
 106
106 -
 107
107 -
 108
108 -
109
-
110
-
111
-
112
-
113
-
114
-
115
-
116
-
117
-
118
-
119
-
120
-
121
-
122
-
123
-
124
-
125
-
126
-
127
-
128
-
129
-
130
-
131
-
132
-
133
-
134
-
135
-
136
 |
 |
