HP Photosmart C4600 User Guide - Page 105
Solution 2: Remove the tape from the print cartridges, Solution, Cause
 |
View all HP Photosmart C4600 manuals
Add to My Manuals
Save this manual to your list of manuals |
Page 105 highlights
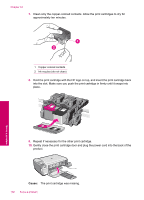
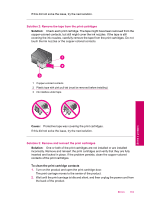
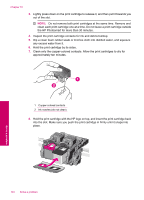
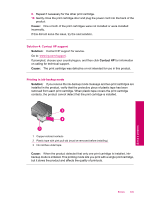
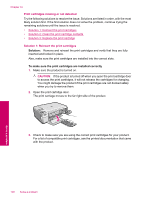
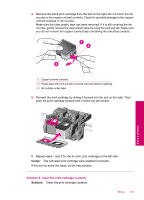
If this did not solve the issue, try the next solution. Solution 2: Remove the tape from the print cartridges Solution: Check each print cartridge. The tape might have been removed from the copper-colored contacts, but still might cover the ink nozzles. If the tape is still covering the ink nozzles, carefully remove the tape from the print cartridges. Do not touch the ink nozzles or the copper-colored contacts. 1 Copper-colored contacts 2 Plastic tape with pink pull tab (must be removed before installing) 3 Ink nozzles under tape Cause: Protective tape was covering the print cartridges. If this did not solve the issue, try the next solution. Solution 3: Remove and reinsert the print cartridges Solution: One or both of the print cartridges are not installed or are installed incorrectly. Remove and reinsert the print cartridges and verify that they are fully inserted and locked in place. If the problem persists, clean the copper-colored contacts of the print cartridges. To clean the print cartridge contacts 1. Turn on the product and open the print cartridge door. The print carriage moves to the center of the product. 2. Wait until the print carriage is idle and silent, and then unplug the power cord from the back of the product. Errors 103 Solve a problem
-
 1
1 -
2
-
3
-
4
-
5
-
6
-
7
-
8
-
9
-
10
-
11
-
12
-
13
-
14
-
15
-
16
-
17
-
18
-
19
-
20
-
21
-
22
-
23
-
24
-
25
-
26
-
27
-
28
-
29
-
30
-
31
-
32
-
33
-
34
-
35
-
36
-
37
-
38
-
39
-
40
-
41
-
42
-
43
-
44
-
45
-
46
-
47
-
48
-
49
-
50
-
51
-
52
-
53
-
54
-
55
-
56
-
57
-
58
-
59
-
60
-
61
-
62
-
63
-
64
-
65
-
66
-
67
-
68
-
69
-
70
-
71
-
72
-
73
-
74
-
75
-
76
-
77
-
78
-
79
-
80
-
81
-
82
-
83
-
84
-
85
-
86
-
87
-
88
-
89
-
90
-
91
-
92
-
93
-
94
-
95
-
96
-
97
-
98
-
99
-
 100
100 -
 101
101 -
 102
102 -
 103
103 -
 104
104 -
 105
105 -
 106
106 -
 107
107 -
 108
108 -
 109
109 -
 110
110 -
111
-
112
-
113
-
114
-
115
-
116
-
117
-
118
-
119
-
120
-
121
-
122
-
123
-
124
-
125
-
126
-
127
-
128
-
129
-
130
-
131
-
132
-
133
-
134
-
135
-
136
 |
 |
