Kodak ESP Office 6150 Extended user guide - Page 14
Using WPS to connect to a Wi-Fi network, Network Settings, WiFi Setup Wizard, WPS Connect - installation software
 |
View all Kodak ESP Office 6150 manuals
Add to My Manuals
Save this manual to your list of manuals |
Page 14 highlights
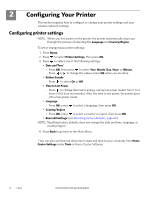
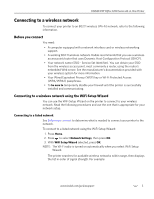
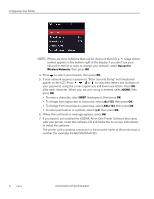
Configuring Your Printer Using WPS to connect to a Wi-Fi network If your router supports Wi-Fi Protected Setup (WPS), you can use WPS Connect. WPS lets you configure your printer for a wireless network by pressing buttons or entering a PIN. To connect to a network using WPS: 1. Press Home. 2. Press to select Network Settings, then press OK. 3. With WiFi Setup Wizard selected, press OK. NOTE: The Wi-Fi radio is turned on automatically when you select Wi-Fi Setup Wizard. 4. Press to select WPS Connect, then press OK. 5. Select one of two methods of connecting: IMPORTANT: Before you press OK on the printer, make sure you know where the router's push button is, or where to enter the generated PIN. If necessary, consult your Internet service provider or router device manufacturer's documentation for more information. • To use push buttons: a. With Push Button Configuration selected, press OK. b. You will have two minutes to push the WPS button on your router (this may either be a physical button on the router or a virtual button in the router's software). • To enter a PIN: a. Press to select Generate WPS PIN, then press OK. b. Go to your router's software and locate the PIN button. c. Enter the PIN you received on the LCD into the PIN screen for your router. 6. When the confirmation message appears, press OK. 7. If you haven't yet installed the KODAK All-in-One Printer Software that came with your printer, insert the software CD and follow the on-screen instructions to install the software. The printer with a wireless connection is listed as the name of the printer plus a number (for example, KodakESP6100+1133). 8 www.kodak.com/go/aiosupport
-
 1
1 -
2
-
3
-
4
-
5
-
6
-
7
-
8
-
 9
9 -
 10
10 -
 11
11 -
 12
12 -
 13
13 -
 14
14 -
 15
15 -
 16
16 -
 17
17 -
 18
18 -
 19
19 -
20
-
21
-
22
-
23
-
24
-
25
-
26
-
27
-
28
-
29
-
30
-
31
-
32
-
33
-
34
-
35
-
36
-
37
-
38
-
39
-
40
-
41
-
42
-
43
-
44
-
45
-
46
-
47
-
48
-
49
-
50
-
51
-
52
-
53
-
54
-
55
-
56
-
57
-
58
-
59
-
60
-
61
-
62
-
63
-
64
-
65
-
66
-
67
-
68
-
69
-
70
-
71
-
72
-
73
-
74
-
75
-
76
-
77
-
78
-
79
-
80
-
81
-
82
-
83
-
84
-
85
-
86
-
87
-
88
-
89
-
90
-
91
 |
 |