Kodak ESP Office 6150 Extended user guide - Page 45
Scanning from the control panel, Start Black, Start Color, Scan Option, Settings, Description - wireless all in one color printer
 |
View all Kodak ESP Office 6150 manuals
Add to My Manuals
Save this manual to your list of manuals |
Page 45 highlights
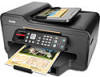
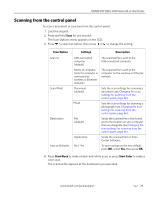
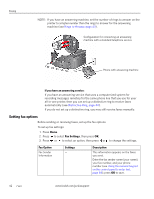
KODAK ESP Office 6100 Series All-in-One Printer Scanning from the control panel To scan a document or a picture from the control panel: 1. Load the original. 2. Press and hold Scan for one second. The Scan Options menu appears on the LCD. 3. Press to select an option, then press or to change the setting. Scan Option Scan To Scan What Destination Save as Defaults Settings Description USB-connected computer (default) The scanned file is sent to the USB-connected computer Name of computer (only if a computer is connected by wireless or Ethernet network) The scanned file is sent to the computer on the wireless or Ethernet network. Document (default) Photo Sets the scan settings for scanning a document (see Changing the scan settings for scanning from the control panel, page 36). Sets the scan settings for scanning a photograph (see Changing the scan settings for scanning from the control panel, page 36). File (default) Sends the scanned file in the format and to the location on your computer that you designate (see Changing the scan settings for scanning from the control panel, page 36). Application Sends the scanned file to Home Center Software. No / Yes To save settings as the new default, press OK, select Yes, then press OK. 4. Press Start Black to make a black-and-white scan, or press Start Color to make a color scan. The scanned file appears at the destination you specified. www.kodak.com/go/aiosupport 39
-
 1
1 -
2
-
3
-
4
-
5
-
6
-
7
-
8
-
9
-
10
-
11
-
12
-
13
-
14
-
15
-
16
-
17
-
18
-
19
-
20
-
21
-
22
-
23
-
24
-
25
-
26
-
27
-
28
-
29
-
30
-
31
-
32
-
33
-
34
-
35
-
36
-
37
-
38
-
39
-
 40
40 -
 41
41 -
 42
42 -
 43
43 -
 44
44 -
 45
45 -
 46
46 -
 47
47 -
 48
48 -
 49
49 -
 50
50 -
51
-
52
-
53
-
54
-
55
-
56
-
57
-
58
-
59
-
60
-
61
-
62
-
63
-
64
-
65
-
66
-
67
-
68
-
69
-
70
-
71
-
72
-
73
-
74
-
75
-
76
-
77
-
78
-
79
-
80
-
81
-
82
-
83
-
84
-
85
-
86
-
87
-
88
-
89
-
90
-
91
 |
 |