Kodak ESP Office 6150 Extended user guide - Page 46
Faxing, Before you begin faxing, Connecting the printer for faxing
 |
View all Kodak ESP Office 6150 manuals
Add to My Manuals
Save this manual to your list of manuals |
Page 46 highlights
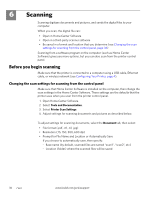
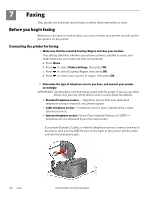
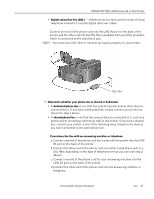
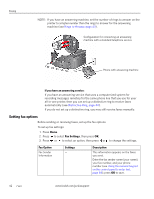
7 Faxing Your printer can send and receive faxes in either black-and-white or color. Before you begin faxing Before you can send or receive faxes, you must connect your printer and set up the fax options on the printer. Connecting the printer for faxing 1. Make sure that the selected Country/Region matches your location. This setting identifies whether your phone system is parallel or serial, and determines how your faxes are sent and received. a. Press Home. b. Press to select Printer Settings, then press OK. c. Press to select Country/Region, then press OK d. Press to select your country or region, then press OK. 2. Determine the type of telephone service you have, and connect your printer accordingly. IMPORTANT: Use the phone cord that was provided with the printer. If you use any other phone cord, you may not be able to send or receive faxes successfully. • Standard telephone service - telephone service that uses dedicated telephone wiring to transmit only phone signals • Cable telephone service - telephone service that is delivered by a cable television service • Internet telephone service (Voice-Over-Internet-Protocol or VOIP) - telephone service delivered by an Internet provider If you have Standard, Cable, or Internet telephone service, connect one end of the phone cord into the LINE IN port on the back of the printer and the other end into the wall phone jack. 40 www.kodak.com/go/aiosupport
-
 1
1 -
2
-
3
-
4
-
5
-
6
-
7
-
8
-
9
-
10
-
11
-
12
-
13
-
14
-
15
-
16
-
17
-
18
-
19
-
20
-
21
-
22
-
23
-
24
-
25
-
26
-
27
-
28
-
29
-
30
-
31
-
32
-
33
-
34
-
35
-
36
-
37
-
38
-
39
-
40
-
 41
41 -
 42
42 -
 43
43 -
 44
44 -
 45
45 -
 46
46 -
 47
47 -
 48
48 -
 49
49 -
 50
50 -
 51
51 -
52
-
53
-
54
-
55
-
56
-
57
-
58
-
59
-
60
-
61
-
62
-
63
-
64
-
65
-
66
-
67
-
68
-
69
-
70
-
71
-
72
-
73
-
74
-
75
-
76
-
77
-
78
-
79
-
80
-
81
-
82
-
83
-
84
-
85
-
86
-
87
-
88
-
89
-
90
-
91
 |
 |