Konica Minolta bizhub 20 bizhub 20 User Guide - Page 131
Examples of poor print, Black toner marks across - drum replacement
 |
View all Konica Minolta bizhub 20 manuals
Add to My Manuals
Save this manual to your list of manuals |
Page 131 highlights
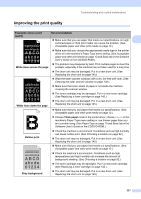
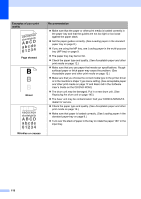
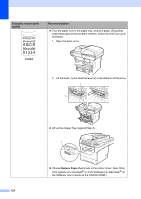
Examples of poor print quality ABCDEFGH abcdefghijk ABCD abcde 01234 Black toner marks across the page ABCDEFGH abcdefghijk ABCD abcde 01234 Recommendation Make sure that you use paper that meets our specifications. (See Acceptable paper and other print media on page 12.) If you use label sheets for laser machines, the glue from the sheets may sometimes stick to the OPC drum surface. Clean the drum unit. Do not use paper that has clips or staples because they will scratch the surface of the drum. If the unpacked drum unit is in direct sunlight or room light, the unit may be damaged. The toner cartridge may be damaged. Put in a new toner cartridge. (See Replacing a toner cartridge on page 143.) The drum unit may be damaged. Put in a new drum unit. (See Replacing the drum unit on page 145.) Clean the laser scanner window and the corona wire inside the drum unit. (See Cleaning the laser scanner window on page 138 and Cleaning the corona wire on page 140.) The drum unit may be damaged. Put in a new drum unit. (See Replacing the drum unit on page 145.) Line across the page ABCDEFGH abcdefghijk ABCD abcde 01234 Black lines down the page Printed pages have toner stains down the page Clean the corona wire inside the drum unit by sliding the blue tab. Be sure to return the blue tab to the home position (a). (See Cleaning the corona wire on page 140.) The toner cartridge may be damaged. Put in a new toner cartridge. (See Replacing a toner cartridge on page 143.) The drum unit may be damaged. Put in a new drum unit. (See Replacing the drum unit on page 145.) The fuser unit may be smudged. Call your KONICA MINOLTA dealer for service. 122
-
 1
1 -
2
-
3
-
4
-
5
-
6
-
7
-
8
-
9
-
10
-
11
-
12
-
13
-
14
-
15
-
16
-
17
-
18
-
19
-
20
-
21
-
22
-
23
-
24
-
25
-
26
-
27
-
28
-
29
-
30
-
31
-
32
-
33
-
34
-
35
-
36
-
37
-
38
-
39
-
40
-
41
-
42
-
43
-
44
-
45
-
46
-
47
-
48
-
49
-
50
-
51
-
52
-
53
-
54
-
55
-
56
-
57
-
58
-
59
-
60
-
61
-
62
-
63
-
64
-
65
-
66
-
67
-
68
-
69
-
70
-
71
-
72
-
73
-
74
-
75
-
76
-
77
-
78
-
79
-
80
-
81
-
82
-
83
-
84
-
85
-
86
-
87
-
88
-
89
-
90
-
91
-
92
-
93
-
94
-
95
-
96
-
97
-
98
-
99
-
100
-
101
-
102
-
103
-
104
-
105
-
106
-
107
-
108
-
109
-
110
-
111
-
112
-
113
-
114
-
115
-
116
-
117
-
118
-
119
-
120
-
121
-
122
-
123
-
124
-
125
-
 126
126 -
 127
127 -
 128
128 -
 129
129 -
 130
130 -
 131
131 -
 132
132 -
 133
133 -
 134
134 -
 135
135 -
 136
136 -
137
-
138
-
139
-
140
-
141
-
142
-
143
-
144
-
145
-
146
-
147
-
148
-
149
-
150
-
151
-
152
-
153
-
154
-
155
-
156
-
157
-
158
-
159
-
160
-
161
-
162
-
163
-
164
-
165
-
166
-
167
-
168
-
169
-
170
-
171
-
172
-
173
-
174
-
175
-
176
-
177
-
178
-
179
-
180
-
181
-
182
-
183
-
184
-
185
-
186
-
187
-
188
-
189
-
190
-
191
-
192
-
193
-
194
-
195
-
196
-
197
-
198
-
199
-
200
-
201
-
202
-
203
 |
 |
