Konica Minolta bizhub 20 bizhub 20 User Guide - Page 152
Replacing a toner cartridge
 |
View all Konica Minolta bizhub 20 manuals
Add to My Manuals
Save this manual to your list of manuals |
Page 152 highlights
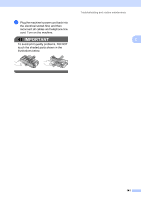
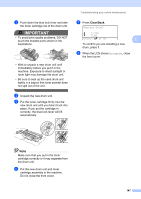
Replacing a toner cartridge C The High Yield toner cartridges can print approximately 8,000 pages 1. Actual page count will vary depending on your average type of document (i.e., standard letter, detailed graphics). When a toner cartridge is running low, the LCD shows Toner Low. 1 Approx. cartridge yield is declared in accordance with ISO/IEC 19752. Note It is a good idea to keep a new toner cartridge ready for use when you see the Toner Low warning. CAUTION HOT SURFACE After you have just used the machine, some internal parts of the machine will be extremely hot. To prevent injury, when you open the front or back cover (back output tray) of the machine DO NOT touch the shaded parts shown in the illustration. If you do this you may get burned. Troubleshooting and routine maintenance a Press the front cover release button and open the front cover. C b Slowly take out the drum unit and toner cartridge assembly. IMPORTANT • We recommend that you put the drum unit and toner cartridge assembly on a clean, flat surface with a sheet of disposable paper or cloth underneath it in case you accidentally spill or scatter toner. • To prevent damage to the machine caused by static electricity, DO NOT touch the electrodes shown in the illustration. 143
-
 1
1 -
2
-
3
-
4
-
5
-
6
-
7
-
8
-
9
-
10
-
11
-
12
-
13
-
14
-
15
-
16
-
17
-
18
-
19
-
20
-
21
-
22
-
23
-
24
-
25
-
26
-
27
-
28
-
29
-
30
-
31
-
32
-
33
-
34
-
35
-
36
-
37
-
38
-
39
-
40
-
41
-
42
-
43
-
44
-
45
-
46
-
47
-
48
-
49
-
50
-
51
-
52
-
53
-
54
-
55
-
56
-
57
-
58
-
59
-
60
-
61
-
62
-
63
-
64
-
65
-
66
-
67
-
68
-
69
-
70
-
71
-
72
-
73
-
74
-
75
-
76
-
77
-
78
-
79
-
80
-
81
-
82
-
83
-
84
-
85
-
86
-
87
-
88
-
89
-
90
-
91
-
92
-
93
-
94
-
95
-
96
-
97
-
98
-
99
-
100
-
101
-
102
-
103
-
104
-
105
-
106
-
107
-
108
-
109
-
110
-
111
-
112
-
113
-
114
-
115
-
116
-
117
-
118
-
119
-
120
-
121
-
122
-
123
-
124
-
125
-
126
-
127
-
128
-
129
-
130
-
131
-
132
-
133
-
134
-
135
-
136
-
137
-
138
-
139
-
140
-
141
-
142
-
143
-
144
-
145
-
146
-
 147
147 -
 148
148 -
 149
149 -
 150
150 -
 151
151 -
 152
152 -
 153
153 -
 154
154 -
 155
155 -
 156
156 -
 157
157 -
158
-
159
-
160
-
161
-
162
-
163
-
164
-
165
-
166
-
167
-
168
-
169
-
170
-
171
-
172
-
173
-
174
-
175
-
176
-
177
-
178
-
179
-
180
-
181
-
182
-
183
-
184
-
185
-
186
-
187
-
188
-
189
-
190
-
191
-
192
-
193
-
194
-
195
-
196
-
197
-
198
-
199
-
200
-
201
-
202
-
203
 |
 |
