Konica Minolta bizhub C280 bizhub C220/C280/C360 Print Operations User Guide - Page 146
Printer specific options Finishing Option 1 to 5
 |
View all Konica Minolta bizhub C280 manuals
Add to My Manuals
Save this manual to your list of manuals |
Page 146 highlights
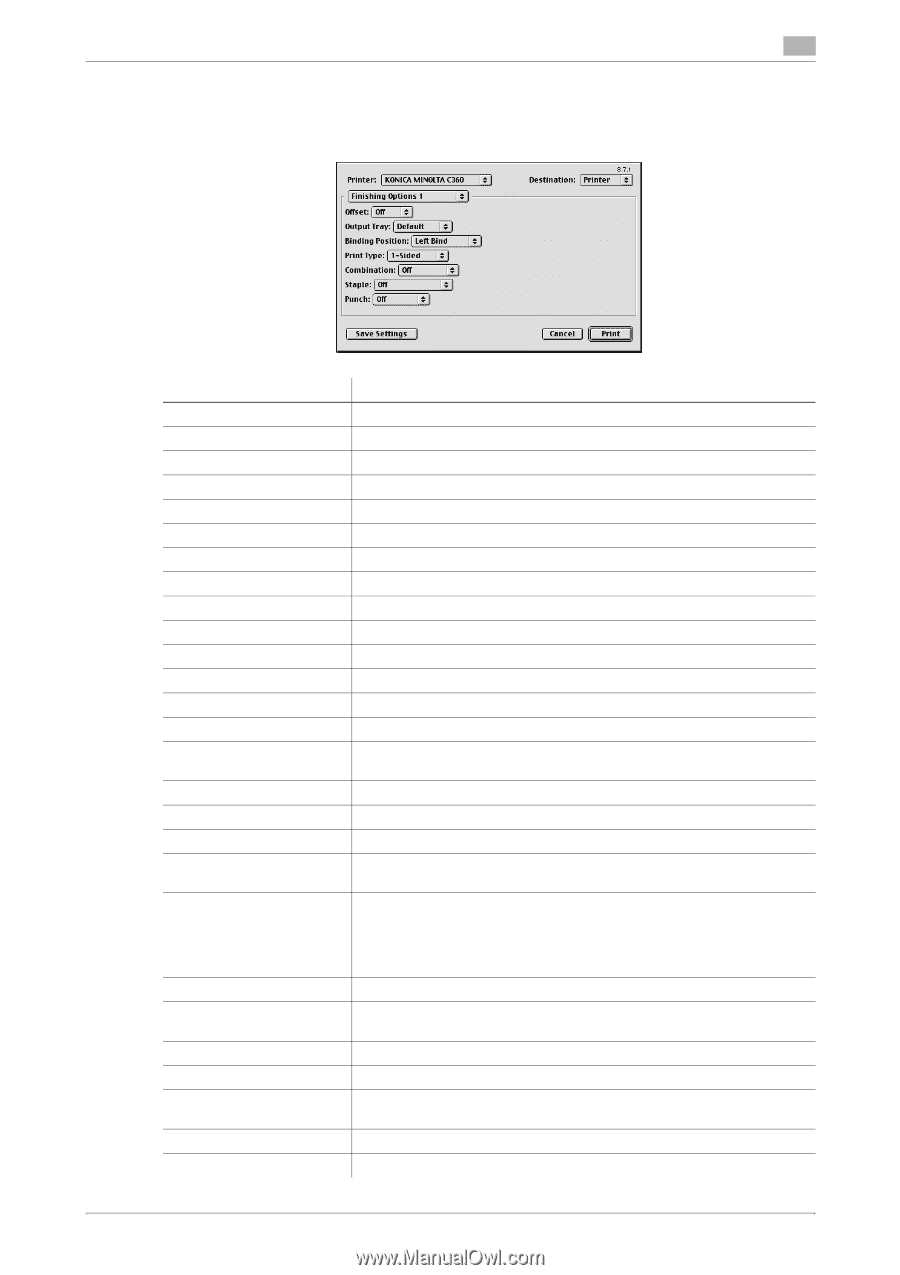
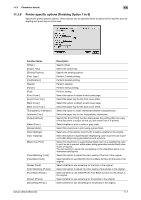
11.3 Parameter details 11 11.3.5 Printer specific options (Finishing Option 1 to 5) Specify the printer specific options. These options can be specified when functions of the machine such as stapling and punching are to be used. Function Name [Offset:] [Output Tray:] [Binding Position:] [Print Type:] [Combination:] [Staple:] [Punch:] [Fold] [Front Cover:] [Front Cover Tray:] [Back Cover:] [Back Cover Tray:] [Transparency Interleave:] [Interleave Tray:] [Output Method:] [Select Color:] [Glossy Mode:] [Color Settings:] [Auto Trapping:] [Black Over Print:] [Color Matching (Text):] [Pure Black (Text):] [Screen (Text):] [Color Matching (Photo):] [Pure Black (Photo):] [Screen (Photo):] [Smoothing (Photo):] Description Specify offset. Select the output tray. Specify the binding position. Perform 2-sided printing. Perform booklet printing. Perform stapling. Perform hole punching. Perform folding. Select this option to attach a front cover page. Select the paper tray for the front cover sheet. Select this option to attach a back cover page. Select the paper tray for the back cover sheet. Select the option to insert interleaves between transparencies. Select the paper tray for the transparency interleaves. Specify the [Proof Print] function that pauses the printing after one copy of the document is output so that you can check how it is printed. Select whether to print in color or gray scale. Select this check box to print using a gloss finish. Select any of the options to print with a quality suitable for the original. Select this option to superimpose neighboring colors to print so as to prevent white space being generated around a picture. Select this check box to superimpose black color on a neighboring color to print so as to prevent white space being generated around black characters or figures. You can specify to cause the overlapping on the characters alone or on characters and figures. Select this option to adjust the color quality of the text in the original. Select whether to use (ON/OFF) the Pure Black function for the texts in the original. Select whether to use screening for the texts in the original. Select this option to adjust the color quality of the photos in the original. Select whether to use (ON/OFF) the Pure Black function for the photos in the original. Select whether to use screening for the photos in the original. Select whether to use smoothing for the photos in the original. bizhub C360/C280/C220 11-7
-
 1
1 -
2
-
3
-
4
-
5
-
6
-
7
-
8
-
9
-
10
-
11
-
12
-
13
-
14
-
15
-
16
-
17
-
18
-
19
-
20
-
21
-
22
-
23
-
24
-
25
-
26
-
27
-
28
-
29
-
30
-
31
-
32
-
33
-
34
-
35
-
36
-
37
-
38
-
39
-
40
-
41
-
42
-
43
-
44
-
45
-
46
-
47
-
48
-
49
-
50
-
51
-
52
-
53
-
54
-
55
-
56
-
57
-
58
-
59
-
60
-
61
-
62
-
63
-
64
-
65
-
66
-
67
-
68
-
69
-
70
-
71
-
72
-
73
-
74
-
75
-
76
-
77
-
78
-
79
-
80
-
81
-
82
-
83
-
84
-
85
-
86
-
87
-
88
-
89
-
90
-
91
-
92
-
93
-
94
-
95
-
96
-
97
-
98
-
99
-
100
-
101
-
102
-
103
-
104
-
105
-
106
-
107
-
108
-
109
-
110
-
111
-
112
-
113
-
114
-
115
-
116
-
117
-
118
-
119
-
120
-
121
-
122
-
123
-
124
-
125
-
126
-
127
-
128
-
129
-
130
-
131
-
132
-
133
-
134
-
135
-
136
-
137
-
138
-
139
-
140
-
 141
141 -
 142
142 -
 143
143 -
 144
144 -
 145
145 -
 146
146 -
 147
147 -
 148
148 -
 149
149 -
 150
150 -
 151
151 -
152
-
153
-
154
-
155
-
156
-
157
-
158
-
159
-
160
-
161
-
162
-
163
-
164
-
165
-
166
-
167
-
168
-
169
-
170
-
171
-
172
-
173
-
174
-
175
-
176
-
177
-
178
-
179
-
180
-
181
-
182
-
183
-
184
-
185
-
186
-
187
-
188
-
189
-
190
-
191
-
192
-
193
-
194
-
195
-
196
-
197
-
198
-
199
-
200
-
201
-
202
-
203
-
204
-
205
-
206
-
207
-
208
-
209
-
210
-
211
-
212
-
213
-
214
-
215
-
216
-
217
-
218
-
219
-
220
-
221
-
222
-
223
-
224
-
225
-
226
-
227
-
228
-
229
-
230
-
231
-
232
-
233
-
234
-
235
-
236
-
237
-
238
-
239
-
240
-
241
-
242
-
243
-
244
-
245
-
246
-
247
-
248
-
249
-
250
-
251
-
252
-
253
-
254
-
255
-
256
-
257
-
258
-
259
-
260
-
261
-
262
-
263
-
264
-
265
-
266
-
267
-
268
-
269
-
270
-
271
-
272
-
273
-
274
-
275
-
276
-
277
-
278
-
279
-
280
-
281
-
282
-
283
-
284
-
285
-
286
-
287
-
288
-
289
-
290
-
291
-
292
-
293
-
294
-
295
-
296
-
297
-
298
-
299
-
300
-
301
-
302
-
303
-
304
-
305
-
306
-
307
-
308
-
309
-
310
-
311
 |
 |