Konica Minolta bizhub C652 bizhub C452/C552/C552DS/C652/C652DS Enlarge Display - Page 31
Finishing - staples
 |
View all Konica Minolta bizhub C652 manuals
Add to My Manuals
Save this manual to your list of manuals |
Page 31 highlights
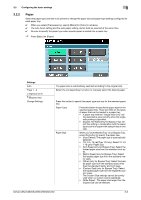
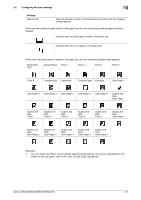
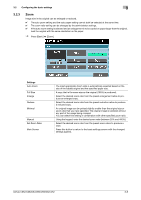
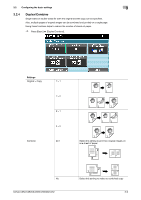
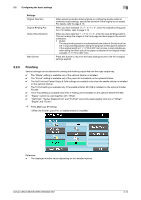
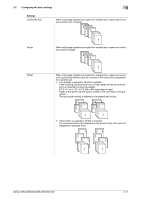
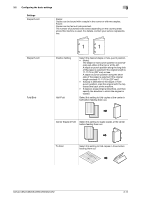
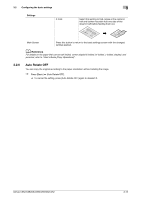
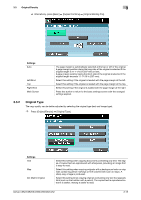
3.2 Configuring the basic settings 3 Settings Original Direction Original Binding Pos. Output Bind Direction Main Screen When scanning double-sided originals or configuring double-sided or combined copy settings, specify the direction of the original to be loaded. For details, refer to page 3-16. When you have selected "2 > 1" or "2 > 2", enter the original binding position. For details, refer to page 3-14. When you have selected "1 > 2" or "2 > 2", enter the copy binding position. This can arrange the images in the front page and back page in the correct orientation. • [Auto]: The copy binding position is automatically set either at the top or at the left. A copy binding position along the long side of the paper is selected if the original length is 11-11/16 in (297 mm) or less. A copy binding position along the short side of the paper is selected if the original length exceeds 11-11/16 in (297 mm). Press this button to return to the basic settings screen with the changed settings applied. 3.2.5 Finishing Various settings can be selected for sorting and finishing copies fed into the copy output tray. 0 The "Staple" setting is available only if the optional finisher is installed. 0 The "Punch" setting is available only if the punch kit is installed on the optional finisher. 0 The Half Fold and Center Staple & Fold settings are available only when the saddle stitcher is installed on the optional finisher. 0 The Tri-Fold setting is available only if the saddle stitcher SD-508 is installed on the optional finisher FS-526. 0 The Z-Fold setting is available only if the Z-folding unit is installed on the optional finisher FS-526. 0 "Staple" cannot be used together with "Offset". 0 "Half-Fold", "Center Staple & Fold" and "Tri-Fold" cannot be used together with any of "Offset", "Staple" and "Punch". % Press [Basic] ö [Finishing]. Reference - The displayed window varies depending on the installed options. bizhub C652/C652DS/C552/C552DS/C452 3-10
-
 1
1 -
2
-
3
-
4
-
5
-
6
-
7
-
8
-
9
-
10
-
11
-
12
-
13
-
14
-
15
-
16
-
17
-
18
-
19
-
20
-
21
-
22
-
23
-
24
-
25
-
 26
26 -
 27
27 -
 28
28 -
 29
29 -
 30
30 -
 31
31 -
 32
32 -
 33
33 -
 34
34 -
 35
35 -
 36
36 -
37
-
38
-
39
-
40
-
41
-
42
-
43
-
44
-
45
-
46
-
47
-
48
-
49
-
50
-
51
-
52
-
53
-
54
-
55
-
56
-
57
-
58
-
59
-
60
-
61
-
62
-
63
-
64
 |
 |