Kyocera TASKalfa 3051ci Printing System (11),(12),(13),(14) Color Printing Gu - Page 48
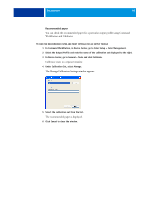
In Command WorkStation, in Device Center, go to General > Tools and click Calibrate.
 |
View all Kyocera TASKalfa 3051ci manuals
Add to My Manuals
Save this manual to your list of manuals |
Page 48 highlights
CALIBRATION 48 TO CREATE A CUSTOM CALIBRATION SET ON THE E100 1 In Command WorkStation, in Device Center, go to General > Tools and click Calibrate. Calibrator starts in a separate window. 2 For Calibration Set, select Manage. The Manage Calibration Settings window appears. 3 Choose a calibration set from the list. Choose the calibration set that is the most similar to your paper. For example, the calibration set might be for the same brand of paper but a different weight. 4 Type a new Recommended Paper description and click Save. 5 Type a name for the custom calibration set and select an output profile to associate it with. Select any output profile for now. You will change this association to your custom output profile after you create the profile. 6 Click OK. A copy of the selected output profile is created and associated with the new calibration set. The copy has the name of the calibration set appended to it. The custom calibration set will be used when you print with its associated output profile. TO CREATE A CUSTOM OUTPUT PROFILE IN COLOR PROFILER SUITE V3.0 1 In Color Profiler Suite, start Printer Profiler and click Print Patches. 2 In the Welcome screen, click Select Fiery Server and choose the E100. The E100 must be connected to your network. 3 Print and measure the measurement page(s) and process the measurements. 4 In the Apply Settings screen, make sure that "Include ColorWise calibration goal" is selected. You are using Color Profiler Suite to create the calibration target (goal). 5 In the Save Profile screen, click Install on Fiery Server and make sure that the E100 is selected. 6 In the Profile Settings window that appears when you save the profile, under Calibration, choose the custom calibration set that you created and click OK. The custom output profile is installed on the E100 and associated with your custom calibration set. When you print a job using this output profile, the calibration set is used as well. You can delete the copy of the output profile that was initially associated with the custom calibration set. This profile is no longer needed. 7 Click Done to exit Printer Profiler.
-
 1
1 -
2
-
3
-
4
-
5
-
6
-
7
-
8
-
9
-
10
-
11
-
12
-
13
-
14
-
15
-
16
-
17
-
18
-
19
-
20
-
21
-
22
-
23
-
24
-
25
-
26
-
27
-
28
-
29
-
30
-
31
-
32
-
33
-
34
-
35
-
36
-
37
-
38
-
39
-
40
-
41
-
42
-
 43
43 -
 44
44 -
 45
45 -
 46
46 -
 47
47 -
 48
48 -
 49
49 -
 50
50 -
 51
51 -
 52
52 -
 53
53 -
54
-
55
-
56
-
57
-
58
-
59
-
60
-
61
-
62
-
63
-
64
-
65
-
66
-
67
-
68
-
69
-
70
-
71
-
72
-
73
-
74
-
75
-
76
-
77
-
78
-
79
-
80
-
81
-
82
-
83
 |
 |