Kyocera TASKalfa 4551ci Printing System (11),(12),(13),(14) Color Reference G - Page 40
In the Color Management Policies area, choose Preserve Embedded Profiles from the RGB and, example
 |
View all Kyocera TASKalfa 4551ci manuals
Add to My Manuals
Save this manual to your list of manuals |
Page 40 highlights
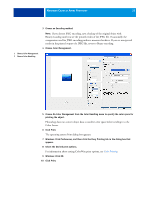
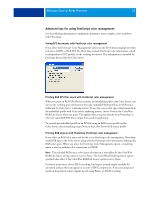
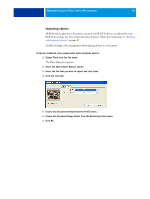
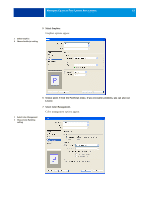
MANAGING COLOR IN PAGE LAYOUT APPLICATIONS 40 3 Choose the desired working space profile for each mode in the Working Spaces area. Use the following guidelines for specifying working spaces: • For RGB, choose the profile for the default RGB color space used by the Color Server, for example, Fiery RGB or EFIRGB. • For CMYK, choose a profile that describes your target press (such as SWOP, DIC, or Japan Color) if you are a prepress user. If you are a user who prints final output, choose an output profile that describes the device connected to the Color Server. To use a devicespecific output profile, you must copy the profile from the Color Server to your computer (see Command WorkStation Help). 4 In the Color Management Policies area, choose Preserve Embedded Profiles from the RGB and CMYK menus. 5 Select the following options: Profile Mismatches: Ask When Opening, Ask When Pasting Missing Profiles: Ask When Opening These options allow you to override the color management policies when opening documents or importing color data. We recommend that you use these settings so that you are notified before any application color management is applied. 6 In the Conversion Options area, choose settings for converting between color spaces. Choose Adobe (ACE) from the Engine menu to use the built-in color management engine for InDesign. Choose a rendering intent from the Intent menu that will optimize the color quality of the conversion. For information about choosing the rendering intent, see the documentation that accompanies InDesign. Select the Use Black Point Compensation option to optimize the quality of color conversions. 7 Click Save to save the current group of color settings. The Save dialog box appears. 8 Name the settings file, accept the default saved location, and click Save. Switch to your saved settings at any time by choosing the group name from the Settings menu at the top of the Color Settings dialog box. NOTE: You can apply the saved color settings in other Adobe Creative Suite applications. You can also apply the saved color settings to all Adobe Creative Suite applications at once using Adobe Bridge. 9 Click OK to apply the settings and close the Color settings dialog box.
-
 1
1 -
2
-
3
-
4
-
5
-
6
-
7
-
8
-
9
-
10
-
11
-
12
-
13
-
14
-
15
-
16
-
17
-
18
-
19
-
20
-
21
-
22
-
23
-
24
-
25
-
26
-
27
-
28
-
29
-
30
-
31
-
32
-
33
-
34
-
 35
35 -
 36
36 -
 37
37 -
 38
38 -
 39
39 -
 40
40 -
 41
41 -
 42
42 -
 43
43 -
 44
44 -
 45
45 -
46
-
47
-
48
-
49
-
50
-
51
-
52
-
53
-
54
-
55
-
56
-
57
-
58
-
59
-
60
-
61
-
62
-
63
-
64
-
65
-
66
-
67
-
68
-
69
-
70
-
71
-
72
-
73
-
74
-
75
-
76
-
77
-
78
-
79
-
80
-
81
-
82
-
83
-
84
-
85
-
86
-
87
-
88
-
89
-
90
-
91
 |
 |