Lenovo J105 Hardware Maintenance Manual - Page 129
translations
 |
View all Lenovo J105 manuals
Add to My Manuals
Save this manual to your list of manuals |
Page 129 highlights
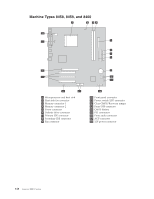
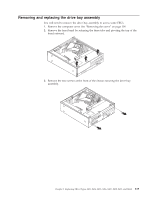
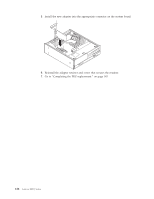
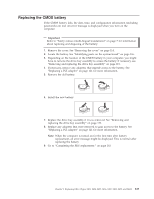
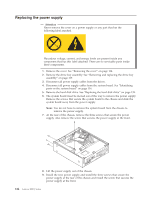
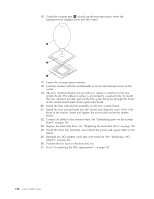
Replacing the CMOS battery If the CMOS battery fails, the date, time, and configuration information (including passwords) are lost. An error message is displayed when you turn on the computer. Important Refer to "Safety notices (multi-lingual translations)" on page 7 for information about replacing and disposing of the battery. 1. Remove the cover. See "Removing the cover" on page 114. 2. Locate the battery. See "Identifying parts on the system board" on page 116. 3. Depending on the location of the CMOS battery in your computer, you might have to remove the drive bay assembly to access the battery. If necessary, see "Removing and replacing the drive bay assembly" on page 119. 4. If necessary, remove any adapters that impede access to the battery. See "Replacing a PCI adapter" on page 121 for more information. 5. Remove the old battery. 6. Install the new battery. 7. Replace the drive bay assembly if it was removed. See "Removing and replacing the drive bay assembly" on page 119. 8. Replace any adapters that were removed to gain access to the battery. See "Replacing a PCI adapter" on page 121 for more information. Note: When the computer is turned on for the first time after battery replacement, an error message might be displayed. This is normal after replacing the battery. 9. Go to "Completing the FRU replacement." on page 143. Chapter 9. Replacing FRUs (Types 8453, 8454, 8455, 8456, 8457, 8458, 8459, and 8460) 123
-
 1
1 -
2
-
3
-
4
-
5
-
6
-
7
-
8
-
9
-
10
-
11
-
12
-
13
-
14
-
15
-
16
-
17
-
18
-
19
-
20
-
21
-
22
-
23
-
24
-
25
-
26
-
27
-
28
-
29
-
30
-
31
-
32
-
33
-
34
-
35
-
36
-
37
-
38
-
39
-
40
-
41
-
42
-
43
-
44
-
45
-
46
-
47
-
48
-
49
-
50
-
51
-
52
-
53
-
54
-
55
-
56
-
57
-
58
-
59
-
60
-
61
-
62
-
63
-
64
-
65
-
66
-
67
-
68
-
69
-
70
-
71
-
72
-
73
-
74
-
75
-
76
-
77
-
78
-
79
-
80
-
81
-
82
-
83
-
84
-
85
-
86
-
87
-
88
-
89
-
90
-
91
-
92
-
93
-
94
-
95
-
96
-
97
-
98
-
99
-
100
-
101
-
102
-
103
-
104
-
105
-
106
-
107
-
108
-
109
-
110
-
111
-
112
-
113
-
114
-
115
-
116
-
117
-
118
-
119
-
120
-
121
-
122
-
123
-
 124
124 -
 125
125 -
 126
126 -
 127
127 -
 128
128 -
 129
129 -
 130
130 -
 131
131 -
 132
132 -
 133
133 -
 134
134 -
135
-
136
-
137
-
138
-
139
-
140
-
141
-
142
-
143
-
144
-
145
-
146
-
147
-
148
-
149
-
150
-
151
-
152
-
153
-
154
-
155
-
156
-
157
-
158
-
159
-
160
-
161
-
162
-
163
-
164
-
165
-
166
-
167
-
168
-
169
-
170
-
171
-
172
-
173
-
174
-
175
-
176
-
177
-
178
-
179
-
180
-
181
-
182
-
183
-
184
-
185
-
186
-
187
-
188
-
189
-
190
-
191
-
192
-
193
-
194
-
195
-
196
-
197
-
198
-
199
-
200
-
201
-
202
-
203
-
204
-
205
-
206
-
207
-
208
-
209
-
210
-
211
-
212
-
213
-
214
-
215
-
216
-
217
-
218
 |
 |
