Lenovo J105 Hardware Maintenance Manual - Page 146
being
 |
View all Lenovo J105 manuals
Add to My Manuals
Save this manual to your list of manuals |
Page 146 highlights
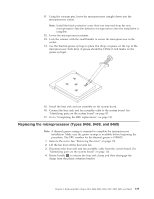
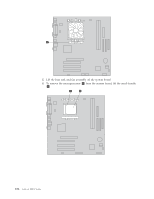
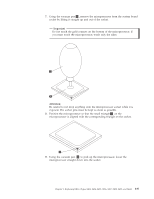
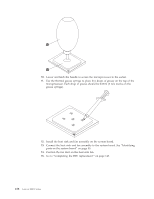
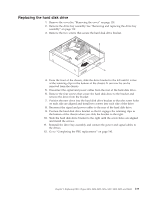
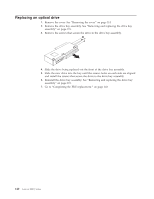
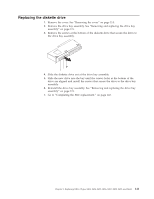
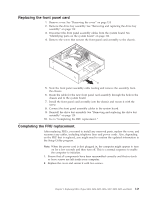
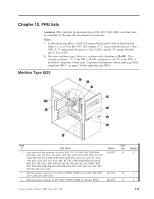
Replacing an optical drive 1. Remove the cover. See "Removing the cover" on page 114. 2. Remove the drive bay assembly. See "Removing and replacing the drive bay assembly" on page 119. 3. Remove the screws that secure the drive in the drive bay assembly. 4. Slide the drive being replaced out the front of the drive bay assembly. 5. Slide the new drive into the bay until the screws holes on each side are aligned and install the screws that secure the drive to the drive bay assembly. 6. Reinstall the drive bay assembly. See "Removing and replacing the drive bay assembly" on page 119. 7. Go to "Completing the FRU replacement." on page 143. 140 Lenovo 3000 J Series
-
 1
1 -
2
-
3
-
4
-
5
-
6
-
7
-
8
-
9
-
10
-
11
-
12
-
13
-
14
-
15
-
16
-
17
-
18
-
19
-
20
-
21
-
22
-
23
-
24
-
25
-
26
-
27
-
28
-
29
-
30
-
31
-
32
-
33
-
34
-
35
-
36
-
37
-
38
-
39
-
40
-
41
-
42
-
43
-
44
-
45
-
46
-
47
-
48
-
49
-
50
-
51
-
52
-
53
-
54
-
55
-
56
-
57
-
58
-
59
-
60
-
61
-
62
-
63
-
64
-
65
-
66
-
67
-
68
-
69
-
70
-
71
-
72
-
73
-
74
-
75
-
76
-
77
-
78
-
79
-
80
-
81
-
82
-
83
-
84
-
85
-
86
-
87
-
88
-
89
-
90
-
91
-
92
-
93
-
94
-
95
-
96
-
97
-
98
-
99
-
100
-
101
-
102
-
103
-
104
-
105
-
106
-
107
-
108
-
109
-
110
-
111
-
112
-
113
-
114
-
115
-
116
-
117
-
118
-
119
-
120
-
121
-
122
-
123
-
124
-
125
-
126
-
127
-
128
-
129
-
130
-
131
-
132
-
133
-
134
-
135
-
136
-
137
-
138
-
139
-
140
-
 141
141 -
 142
142 -
 143
143 -
 144
144 -
 145
145 -
 146
146 -
 147
147 -
 148
148 -
 149
149 -
 150
150 -
 151
151 -
152
-
153
-
154
-
155
-
156
-
157
-
158
-
159
-
160
-
161
-
162
-
163
-
164
-
165
-
166
-
167
-
168
-
169
-
170
-
171
-
172
-
173
-
174
-
175
-
176
-
177
-
178
-
179
-
180
-
181
-
182
-
183
-
184
-
185
-
186
-
187
-
188
-
189
-
190
-
191
-
192
-
193
-
194
-
195
-
196
-
197
-
198
-
199
-
200
-
201
-
202
-
203
-
204
-
205
-
206
-
207
-
208
-
209
-
210
-
211
-
212
-
213
-
214
-
215
-
216
-
217
-
218
 |
 |

Replacing
an
optical
drive
1.
Remove
the
cover.
See
“Removing
the
cover”
on
page
114.
2.
Remove
the
drive
bay
assembly.
See
“Removing
and
replacing
the
drive
bay
assembly”
on
page
119.
3.
Remove
the
screws
that
secure
the
drive
in
the
drive
bay
assembly.
4.
Slide
the
drive
being
replaced
out
the
front
of
the
drive
bay
assembly.
5.
Slide
the
new
drive
into
the
bay
until
the
screws
holes
on
each
side
are
aligned
and
install
the
screws
that
secure
the
drive
to
the
drive
bay
assembly.
6.
Reinstall
the
drive
bay
assembly.
See
“Removing
and
replacing
the
drive
bay
assembly”
on
page
119.
7.
Go
to
“Completing
the
FRU
replacement.”
on
page
143.
140
Lenovo
3000
J
Series